There are two ways to bring new residents into your community on Communitrak: invite them one at a time with the Invite Member button, or send the Communitrak team a spreadsheet and have your full roster imported at once. This article covers both, plus what your residents receive and how they activate their accounts.

Inviting members requires the Invite Members and Invite Members via Email permissions.
Choosing a new member's community role during the invite requires the Change Member Role permission. Without it, new members get your community's default role.
Invitations are always sent by email. A phone number you enter is saved to the member's record and isn't texted.
Bulk imports are run only by the Communitrak team. There's no import tool for leaders.
Some options may be unavailable or appear differently depending on your level of account access.
Confirm your own email address first. Until you do, Communitrak won't send invitations from your account. You can still add members with Send invitation immediately unchecked.
While Communitrak is verifying a new community, you can send invitations to up to 10 people in total, and resend up to 5 invitations a day. The limits lift once verification is complete. You can keep adding properties, households, and members without sending invitations in the meantime, and invite everyone once verification is complete.
Use this option to add one or a few residents at a time. The invite walks you through choosing (or creating) a property and household, then entering the new member's details. If the property or household doesn't exist yet, Communitrak creates it as part of the invite, so you don't need to set those up first.
We recommend using this option to invite your fellow board members during your trial so you can try Communitrak together.
In the main navigation menu, expand Members & Groups and click Community Members.
Click Invite Member in the top-right corner.
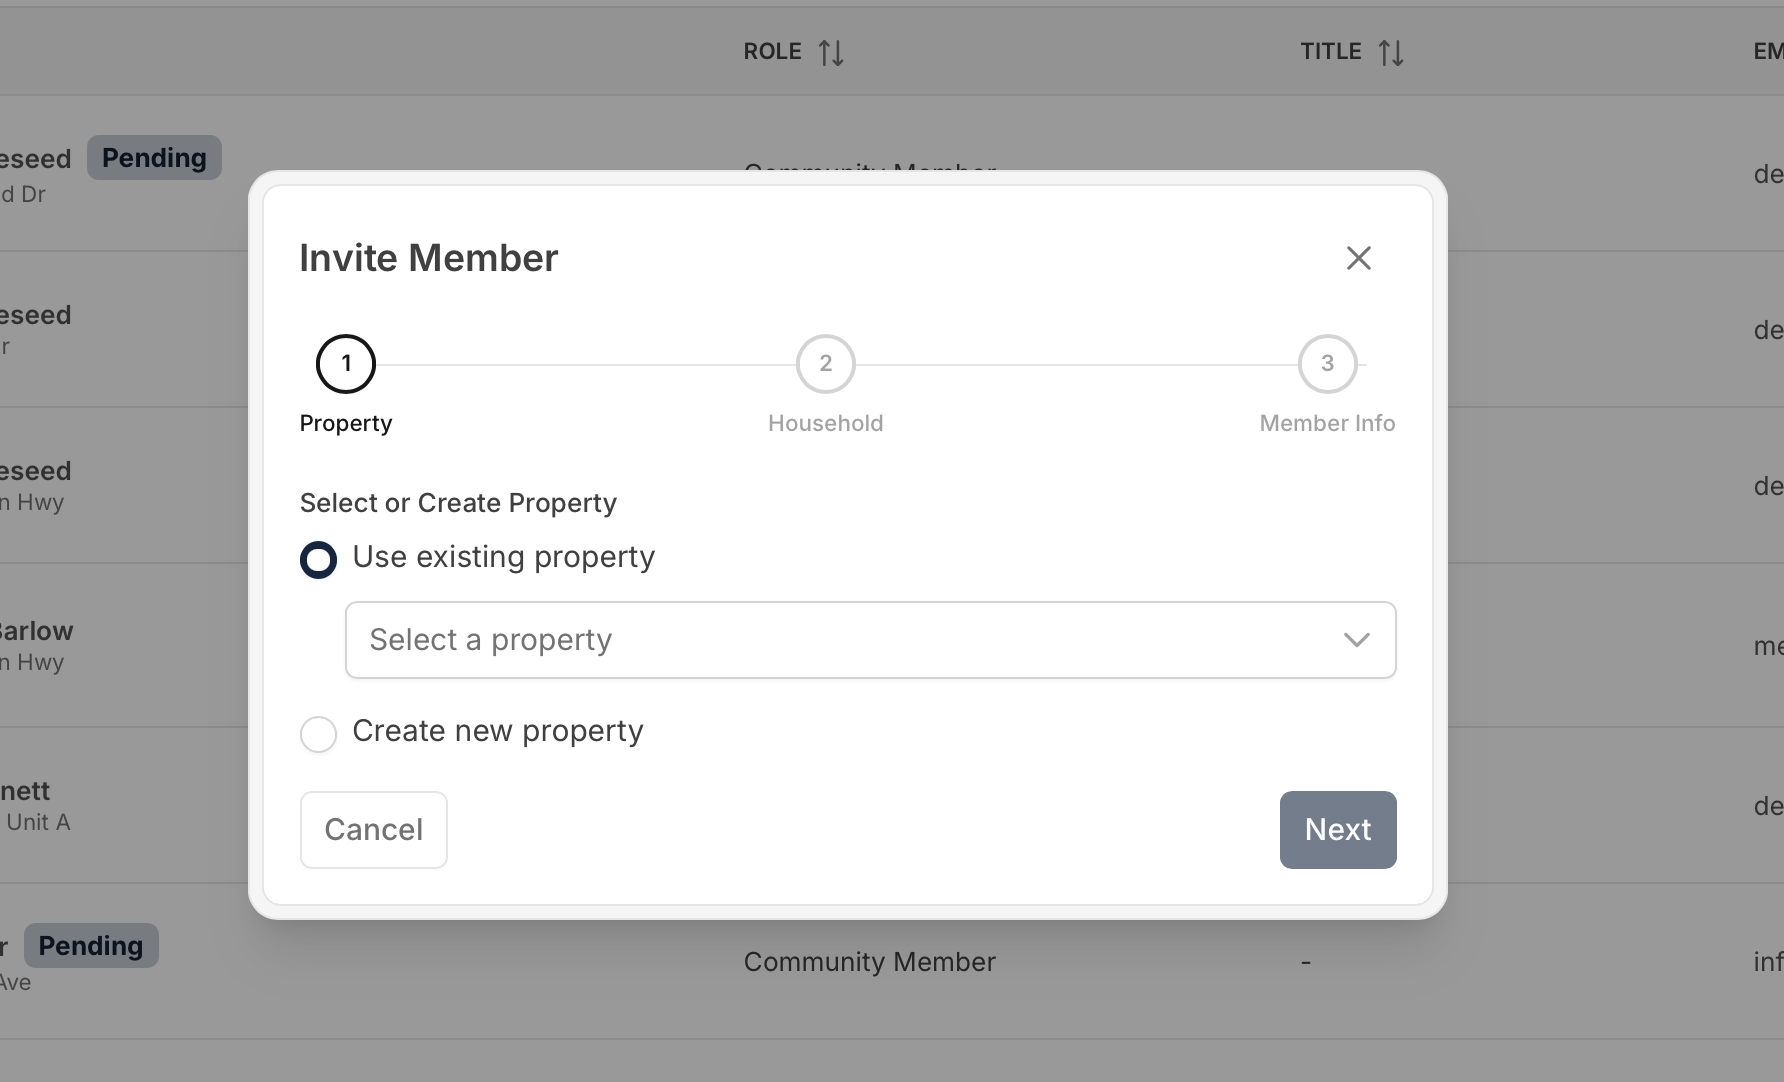
The Invite Member dialog has three steps: Property, Household, and Member Info.
Choose the property where the new member lives.
Use existing property: select the property from the dropdown. Only active properties are listed.
Create new property: if the address isn't in Communitrak yet, choose an Address Type:
Street Address: enter the street address, an optional apartment or unit, city, state, and ZIP.
Lot Number: enter the lot number, an optional unit, city, state, and ZIP.
For a new property, click Validate Address. Communitrak standardizes the address and shows it under Please verify the formatted address. Click Confirm Address to continue, or Back to correct it. For an existing property, click Next.
Choose which household at this property the new member belongs to.
Use existing household: select the household from the dropdown. Each entry shows the household name and how many members it has. Inactive households are marked (inactive). If the property has no households yet, you'll see "No households found for this property" and need to create one.
Create new household: optionally enter a Household Name (for example, "Smith Family"). Leave it blank to have the household named after its members.
If you created a new property in Step 1, Communitrak creates a new household with it. Click Next.
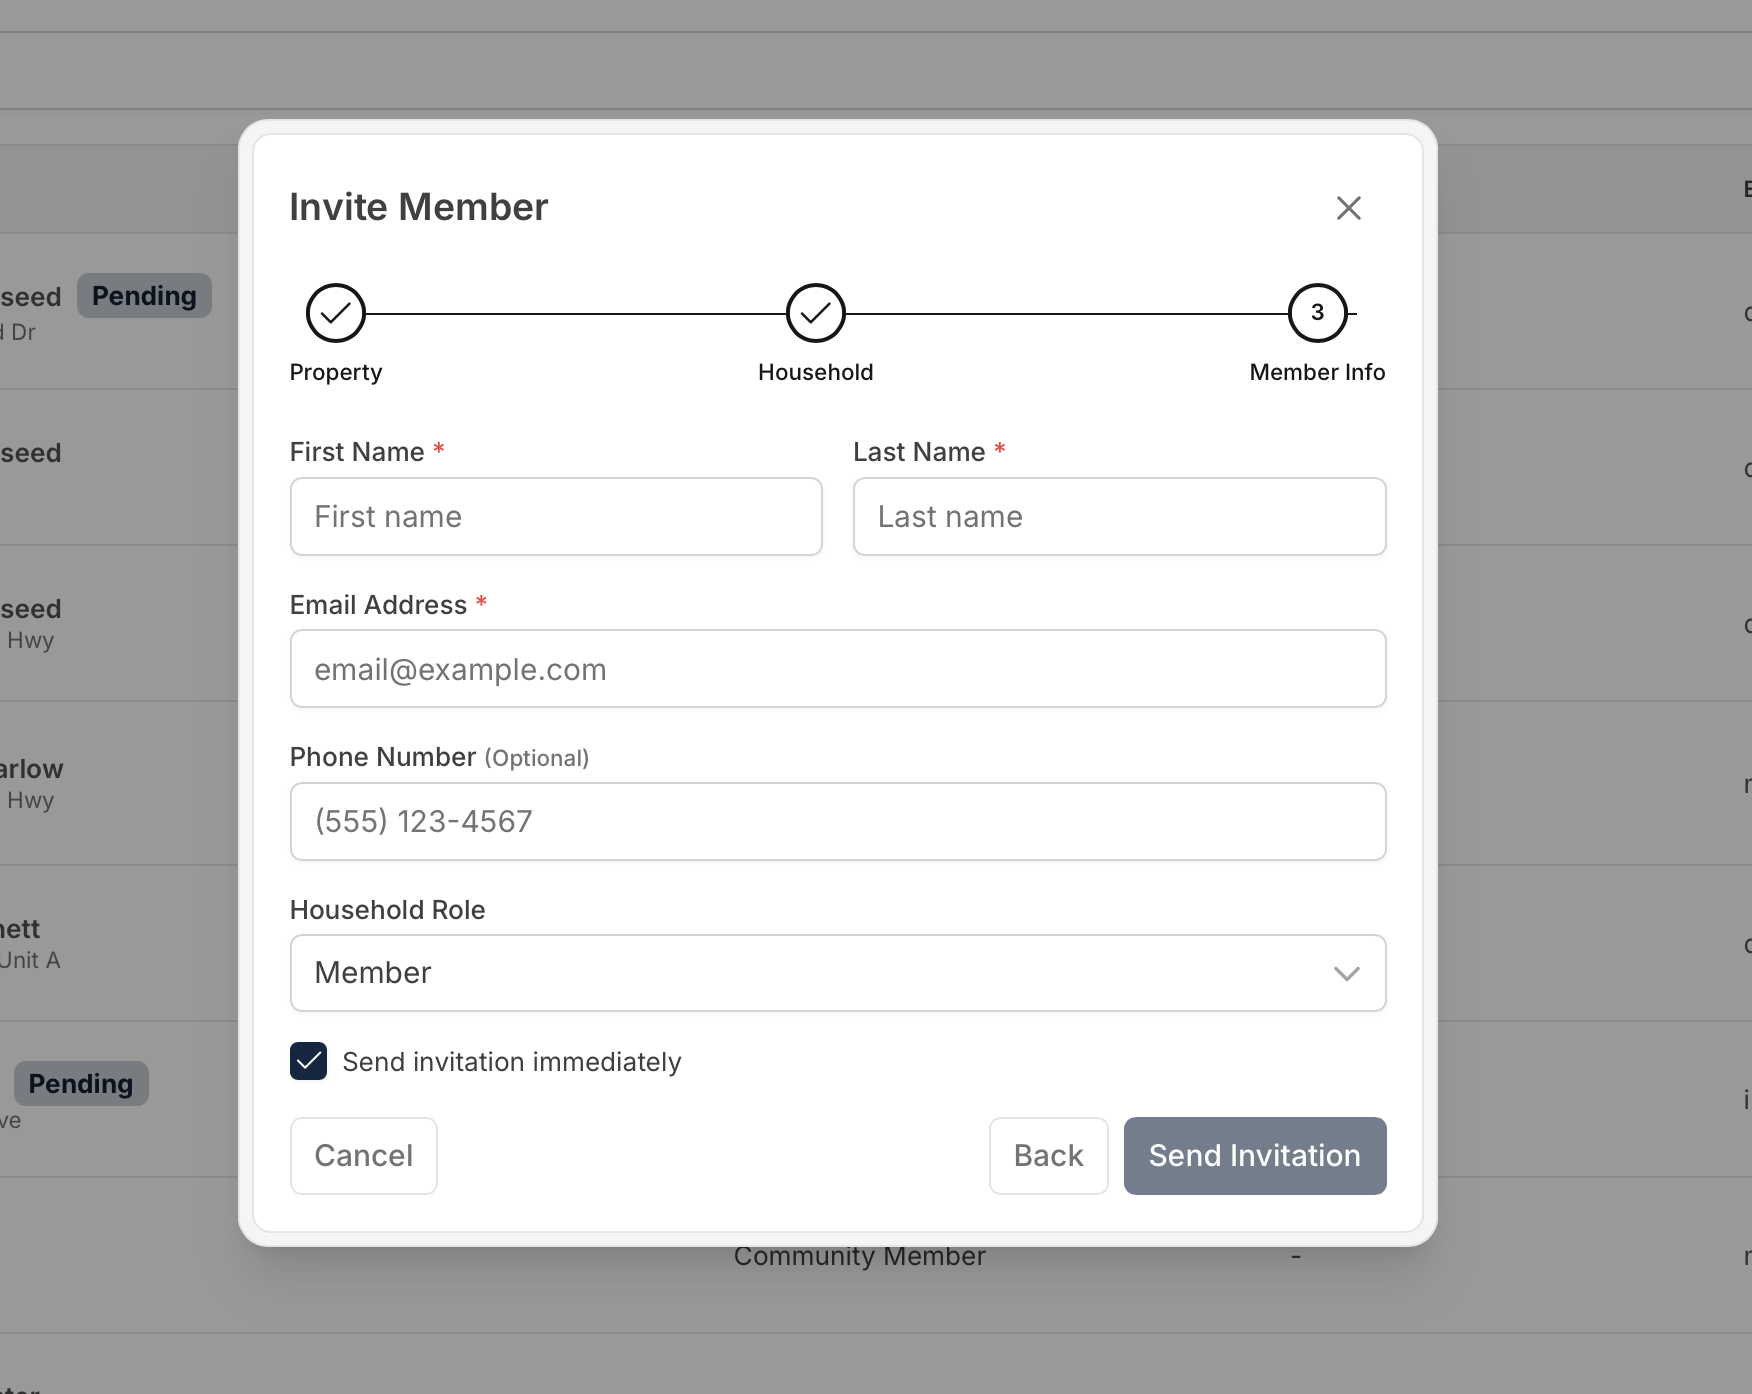
Enter the new member's details:
First Name and Last Name (required)
Email Address (required). This is where the invitation goes.
Phone Number (optional)
Household Role: Member or Head of Household. The Head of Household can invite and manage the rest of their household once they've activated.
Community Role: shown if you have the Change Member Role permission. It starts at your community's default member role. Roles marked Admin only (Community Admin, and any role with billing or AI usage permissions) can only be chosen by a Community Admin. A role tagged Leader starts the member as a community leader.
Send invitation immediately is checked by default. Leave it checked to email the invitation as soon as you finish. Uncheck it to add the member without contacting them yet (see "Adding a member without sending the invitation" below).
Click Send Invitation. If you unchecked Send invitation immediately, the button reads Add Member instead.
A confirmation screen shows the member's name, email, phone, and Invite Code. It's titled Invitation Sent! when the email went out, and Member Added! when no invitation was sent. From here you can:
Click Add Another to invite someone else to the same property and household. If this invite created the property or household, Add Another selects the one it just created.
Click Close to return to the Community Members page.
The new member appears in the Pending tab on the Community Members page until they activate their account.
If you're already looking at a household, you can invite someone straight into it. Open the household from Households, then click Invite Member in the household's member list or actions. Enter their name, email, optional phone number, and household role, then click Send Invitation. The invitation goes out right away and the member gets your community's default role.
When one person owns several properties in your community, they keep a single Communitrak login and get a separate household membership at each property. You don't create a new account for each address.
Run the Invite Member dialog once for each additional property:
In Step 1: Property, select the additional property.
In Step 2: Household, choose Create new household if the property still shows the previous owner's household. Don't add the new owner to the old household. You can set the previous household to inactive separately.
In Step 3: Member Info, enter the same email address the owner already uses in your community, and choose their Household Role.
What happens next depends on where the owner's account stands:
They've activated their account and confirmed their email: a blue note under the email field says they're already a member here and lists their current address. The button changes to Add to Household. When you click it, they're added right away with no invitation or invite code, and they get an email saying who added them and at which address. Their existing name and account details are kept.
They haven't finished activating: the dialog sends a regular invitation for this property, with its own invite code.
They're already at this property: a yellow note says they're already a member at this address, and the invite won't go through. Nothing more is needed.
The owner moves between their properties using the household switcher at the bottom of the main navigation menu. When they sign in, Communitrak asks which household they want to use for that session.
If you're onboarding your whole community or have a large number of residents to add, the Communitrak team imports them for you from a spreadsheet. Imports are free, and only the Communitrak team can run them. They're run after Communitrak has verified your community.
Send a CSV or spreadsheet with one row per resident and these columns:
First name and last name (required)
Address (required): a street address or a lot number, plus unit, city, state, and ZIP
Email: needed for the resident to receive an invitation
Phone (optional)
Household role (optional): head or member
Residents who share an address are placed in the same household. If an owner has more than one property, give them a separate row for each address with the same email address, and the Communitrak team will link every property to one login.
Prepare your file with the columns listed above.
Chat with Communitrak Support using the messenger icon in the bottom-right corner of any page and attach your file.
Tell the team whether you want invitations emailed as soon as the import finishes, or held so you can review the roster and send them yourself later.
The team reviews your file, flags duplicates and address conflicts with you, and imports your residents. Properties and households are created automatically.
Each invited resident gets an email from your community titled "Welcome to your community on Communitrak!" It shows the property address, an Accept Invitation button, and an 8-character access code. They can also enter the code at https://app.communitrak.com/join/resident.
To activate, the resident confirms your community, reviews the name you entered, and creates a password. If they already have a Communitrak account from another community, they sign in with it instead.
An invitation works for 90 days. Resending it gives the same code a fresh 90 days.
Until they activate, the resident appears in the Pending tab on the Community Members page. Once they activate, they move to Active.
If Black Curtain is turned on in Preferences, residents can activate their accounts but can't sign in until you turn it off.
If you uncheck Send invitation immediately, or a member was imported without an email address, they're added as Pending but haven't been contacted. Communitrak doesn't send them any community emails until their invitation goes out.
When you're ready, send it from their profile or the Pending tab. For a member with no email on file, open their profile, click Add Email Address, save it, and then click Resend Invitation. See "Resending Member Invitations" for the steps. While your community is being verified, this first invitation counts toward the 10-person limit.
The access code is tied to the person you invited. Anyone who uses it activates that person's account, so ask residents not to forward their invitation.
Entered the wrong email? While the member is still pending, open their profile, use Update Email in their contact menu, and then resend the invitation.
To withdraw an invitation, open the member's profile and click Cancel & Remove. This requires the Manage Invite Status permission and removes the pending member from the household.
New members get the default member role set in your community's Preferences unless you choose a different role during or after the invite.
If the role you assign is tagged Leader by default under Community → Roles, the new member starts out marked as a community leader. You can change that on their profile at any time without changing their role.
If you have questions or need help, chat with Communitrak Support from any page using the messenger icon in the bottom-right corner.
