This article covers setting up your community's amenities: turning on Amenities, creating an amenity, choosing how residents get in, setting its hours and closures, and configuring reservations, fees, and deposits. For handling reservations once residents start booking, see the article on using the Reservation Manager.
Each part has its own permission:
Create Amenity: add a new amenity.
Edit Amenity Details: change everything on an amenity's edit page.
Delete Amenity: delete an amenity.
Create Amenity Calendar Event, Edit Amenity Calendar Event, and Delete Amenity Calendar Event: manage events on an amenity's calendar, including events that block reservations.
Update Community Preferences: turn the Amenities module on or off.
Residents need Create a Reservation to book. Some options may be unavailable or appear differently depending on your level of account access.
Click Community in the main navigation menu.
Click the Preferences tab.
Turn on the Amenities toggle.
Amenities then appears in the main navigation menu for everyone in your community. Fees and deposits also need the Financial module turned on and your community's payment account set up.
Click Amenities in the main navigation menu.
Click Create Amenity. On a phone, tap the + button.
In the Create New Amenity dialog, enter an Amenity Name.
Optionally enter an Amenity Description. Residents see it on the amenity's card.
Choose an Amenity Type: Pool, Gym, Tennis Court, Basketball Court, Playground, Clubhouse, Park, or Other.
Click Create Amenity.
The amenity's edit page opens so you can finish setting it up. Until you change them, a new amenity is open to everyone, shows as open 24/7, and doesn't take reservations.
Click Amenities in the main navigation menu.
Click the pencil icon on the amenity's card.
Make your changes in the sections below.
Click Save Changes at the bottom of the page. Click Cancel to leave without saving.
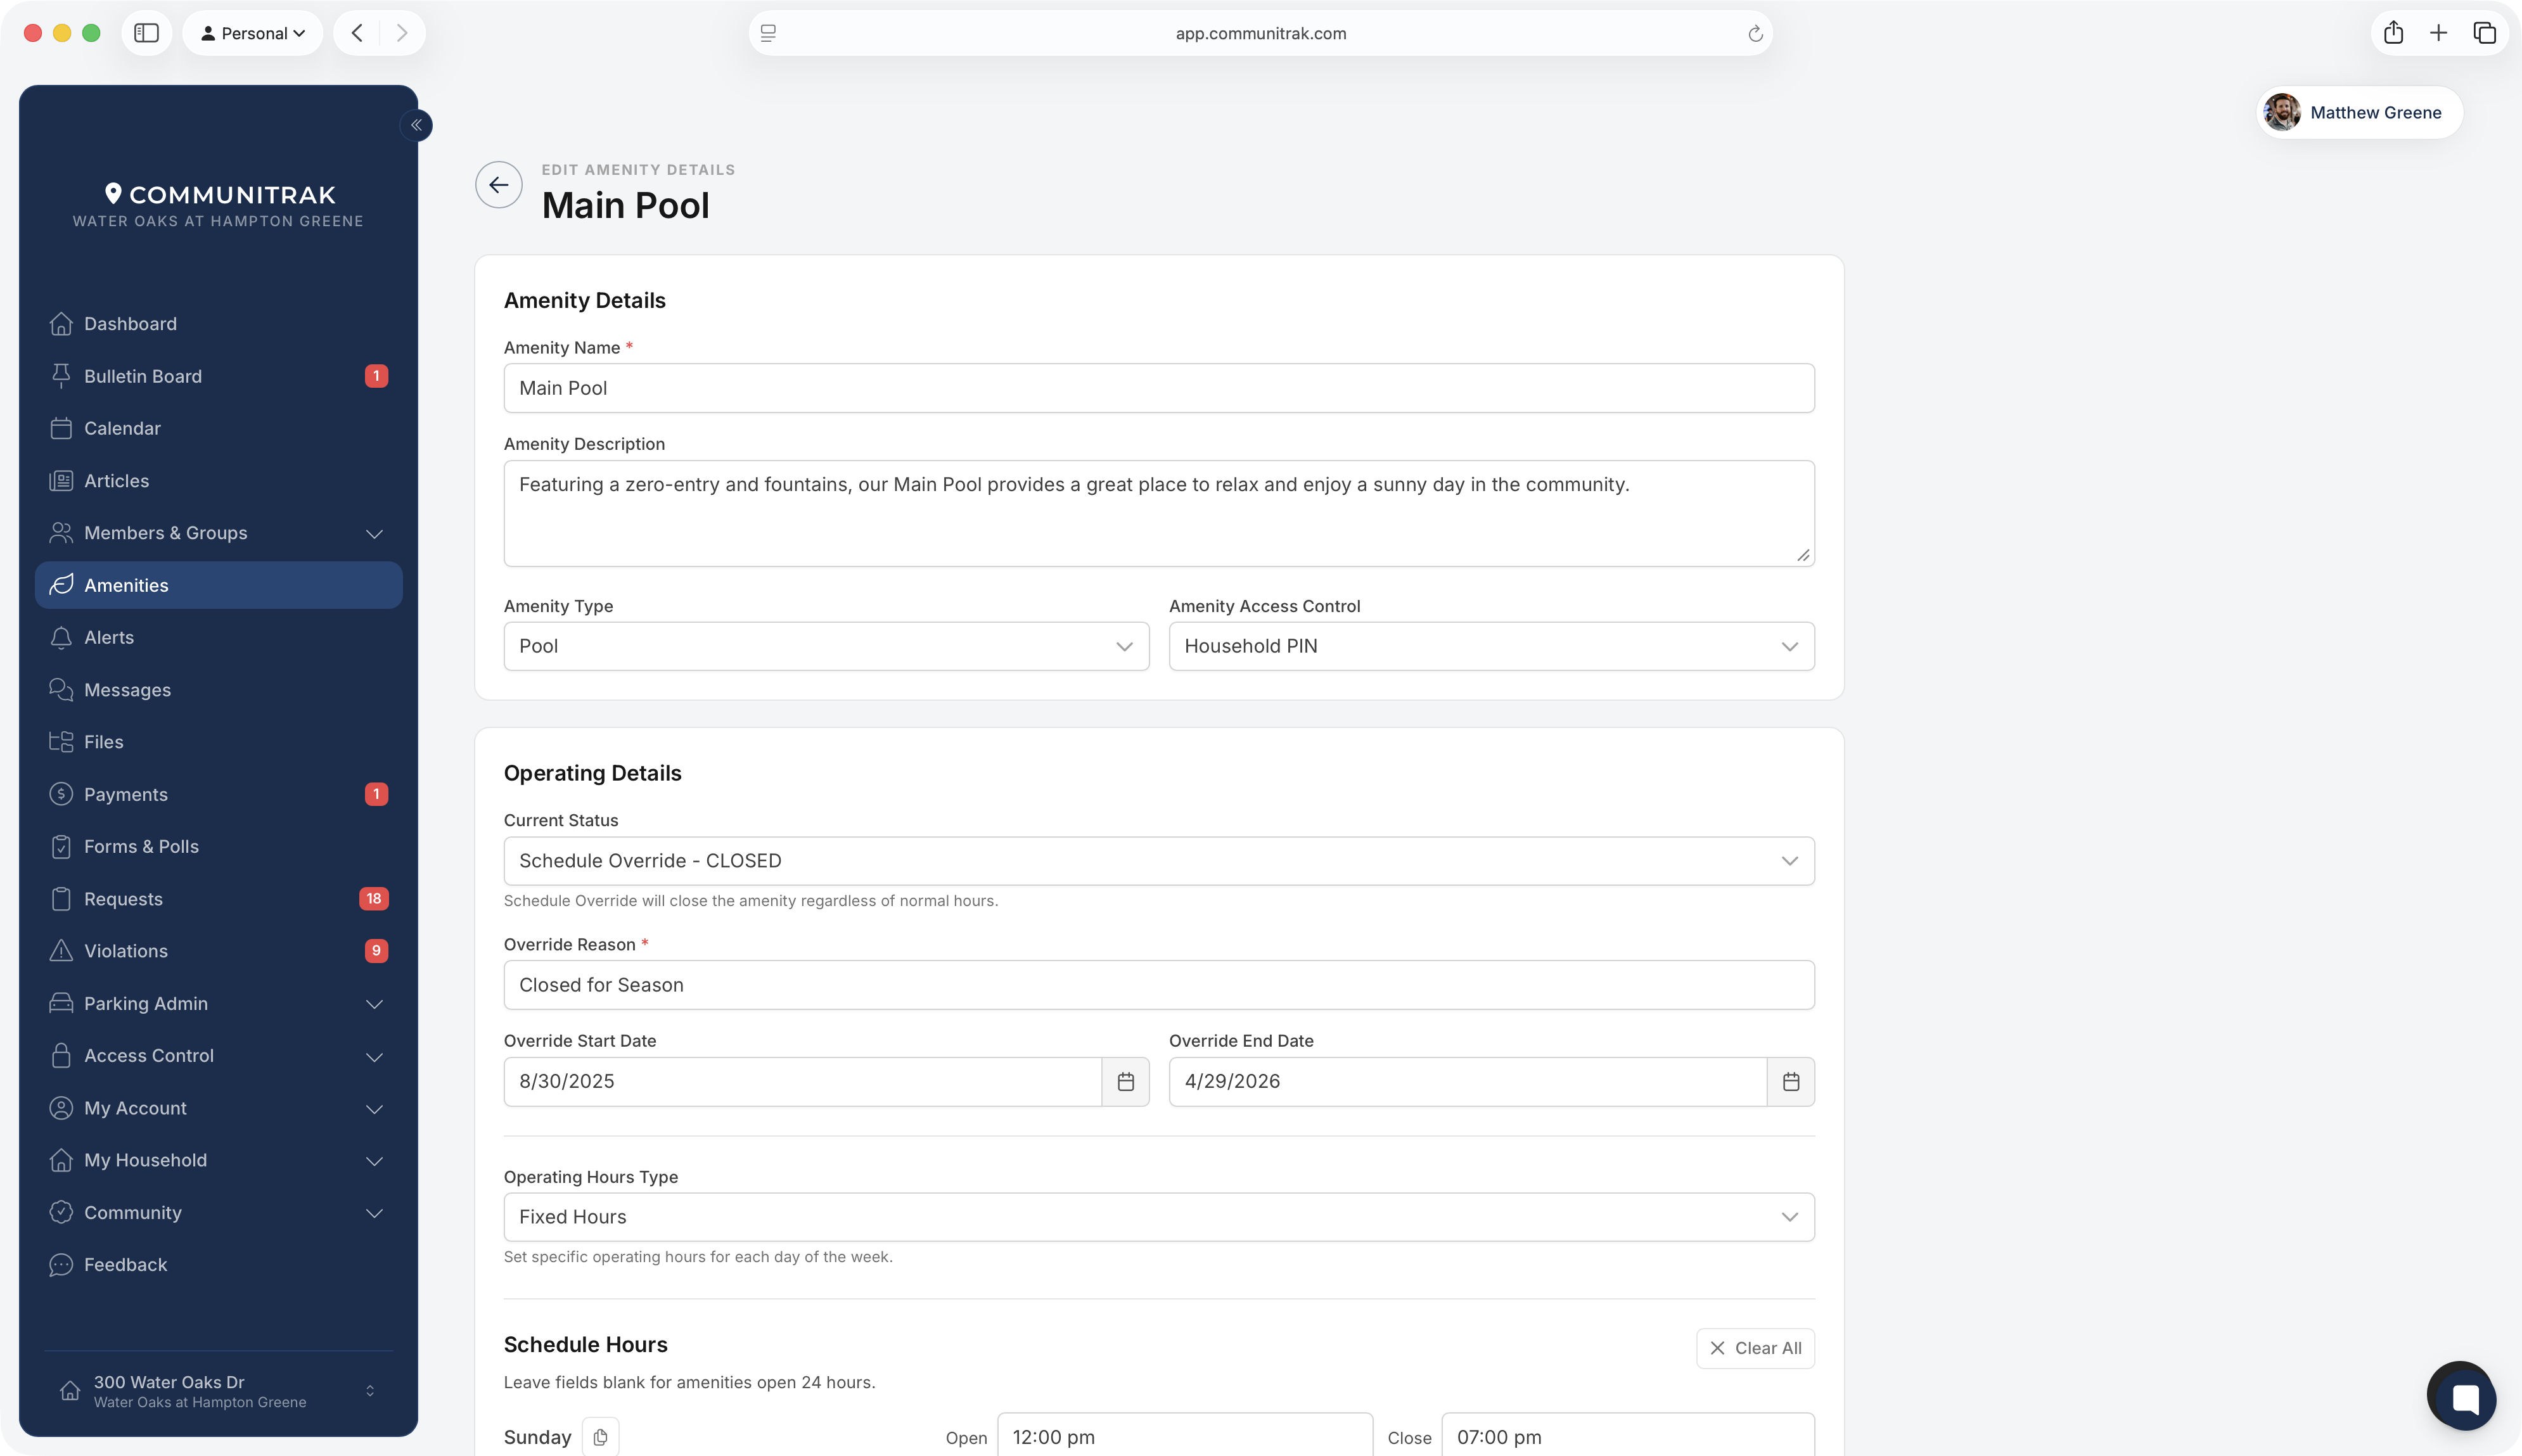
Amenity Name and Amenity Description: what residents see on the card.
Amenity Type: for your own reference. It doesn't change how the amenity looks or works.
Amenity Access Control: how residents get in. The card shows residents the text in quotes:
Open (no code or ID): "Open to All Residents".
Access Code: a code shared by everyone. Enter it in the Access Code field that appears. Every resident sees the code on the card.
Key Card: "Resident Key Card Required".
Household PIN: each resident sees their own household's PIN on the card.
Communitrak Access: the amenity's doors are controlled by your access control system. This option appears only when your community uses Access Control.
When you choose Communitrak Access, a Linked Access Control Doors field appears. Choose the doors or gates that control entry, such as a pool's Main Gate and South Gate. At least one door is required. Edit Amenity Details is all you need to link doors.
A door belongs to one amenity. A door that's already linked shows Linked to and the other amenity's name, and choosing it moves it to this one when you save.
You can also set the same link from the door's settings in Access Control.
Switching the amenity to any other access type removes its door links when you save.
If your community later turns off Access Control, the edit page asks you to choose a new access type before you can save.
This section controls the hours and status residents see on the amenity's card.
Fixed Hours: set an Open and Close time for each day under Schedule Hours, or check Closed for a day the amenity doesn't open.
Sunrise to Sunset: hours follow sunrise and sunset at your community's location.
Open 24/7: always open.
Shortcuts for Fixed Hours:
Set Sunday's times, then click the copy icon next to Sunday to copy them to every day.
Click Clear All to clear every day.

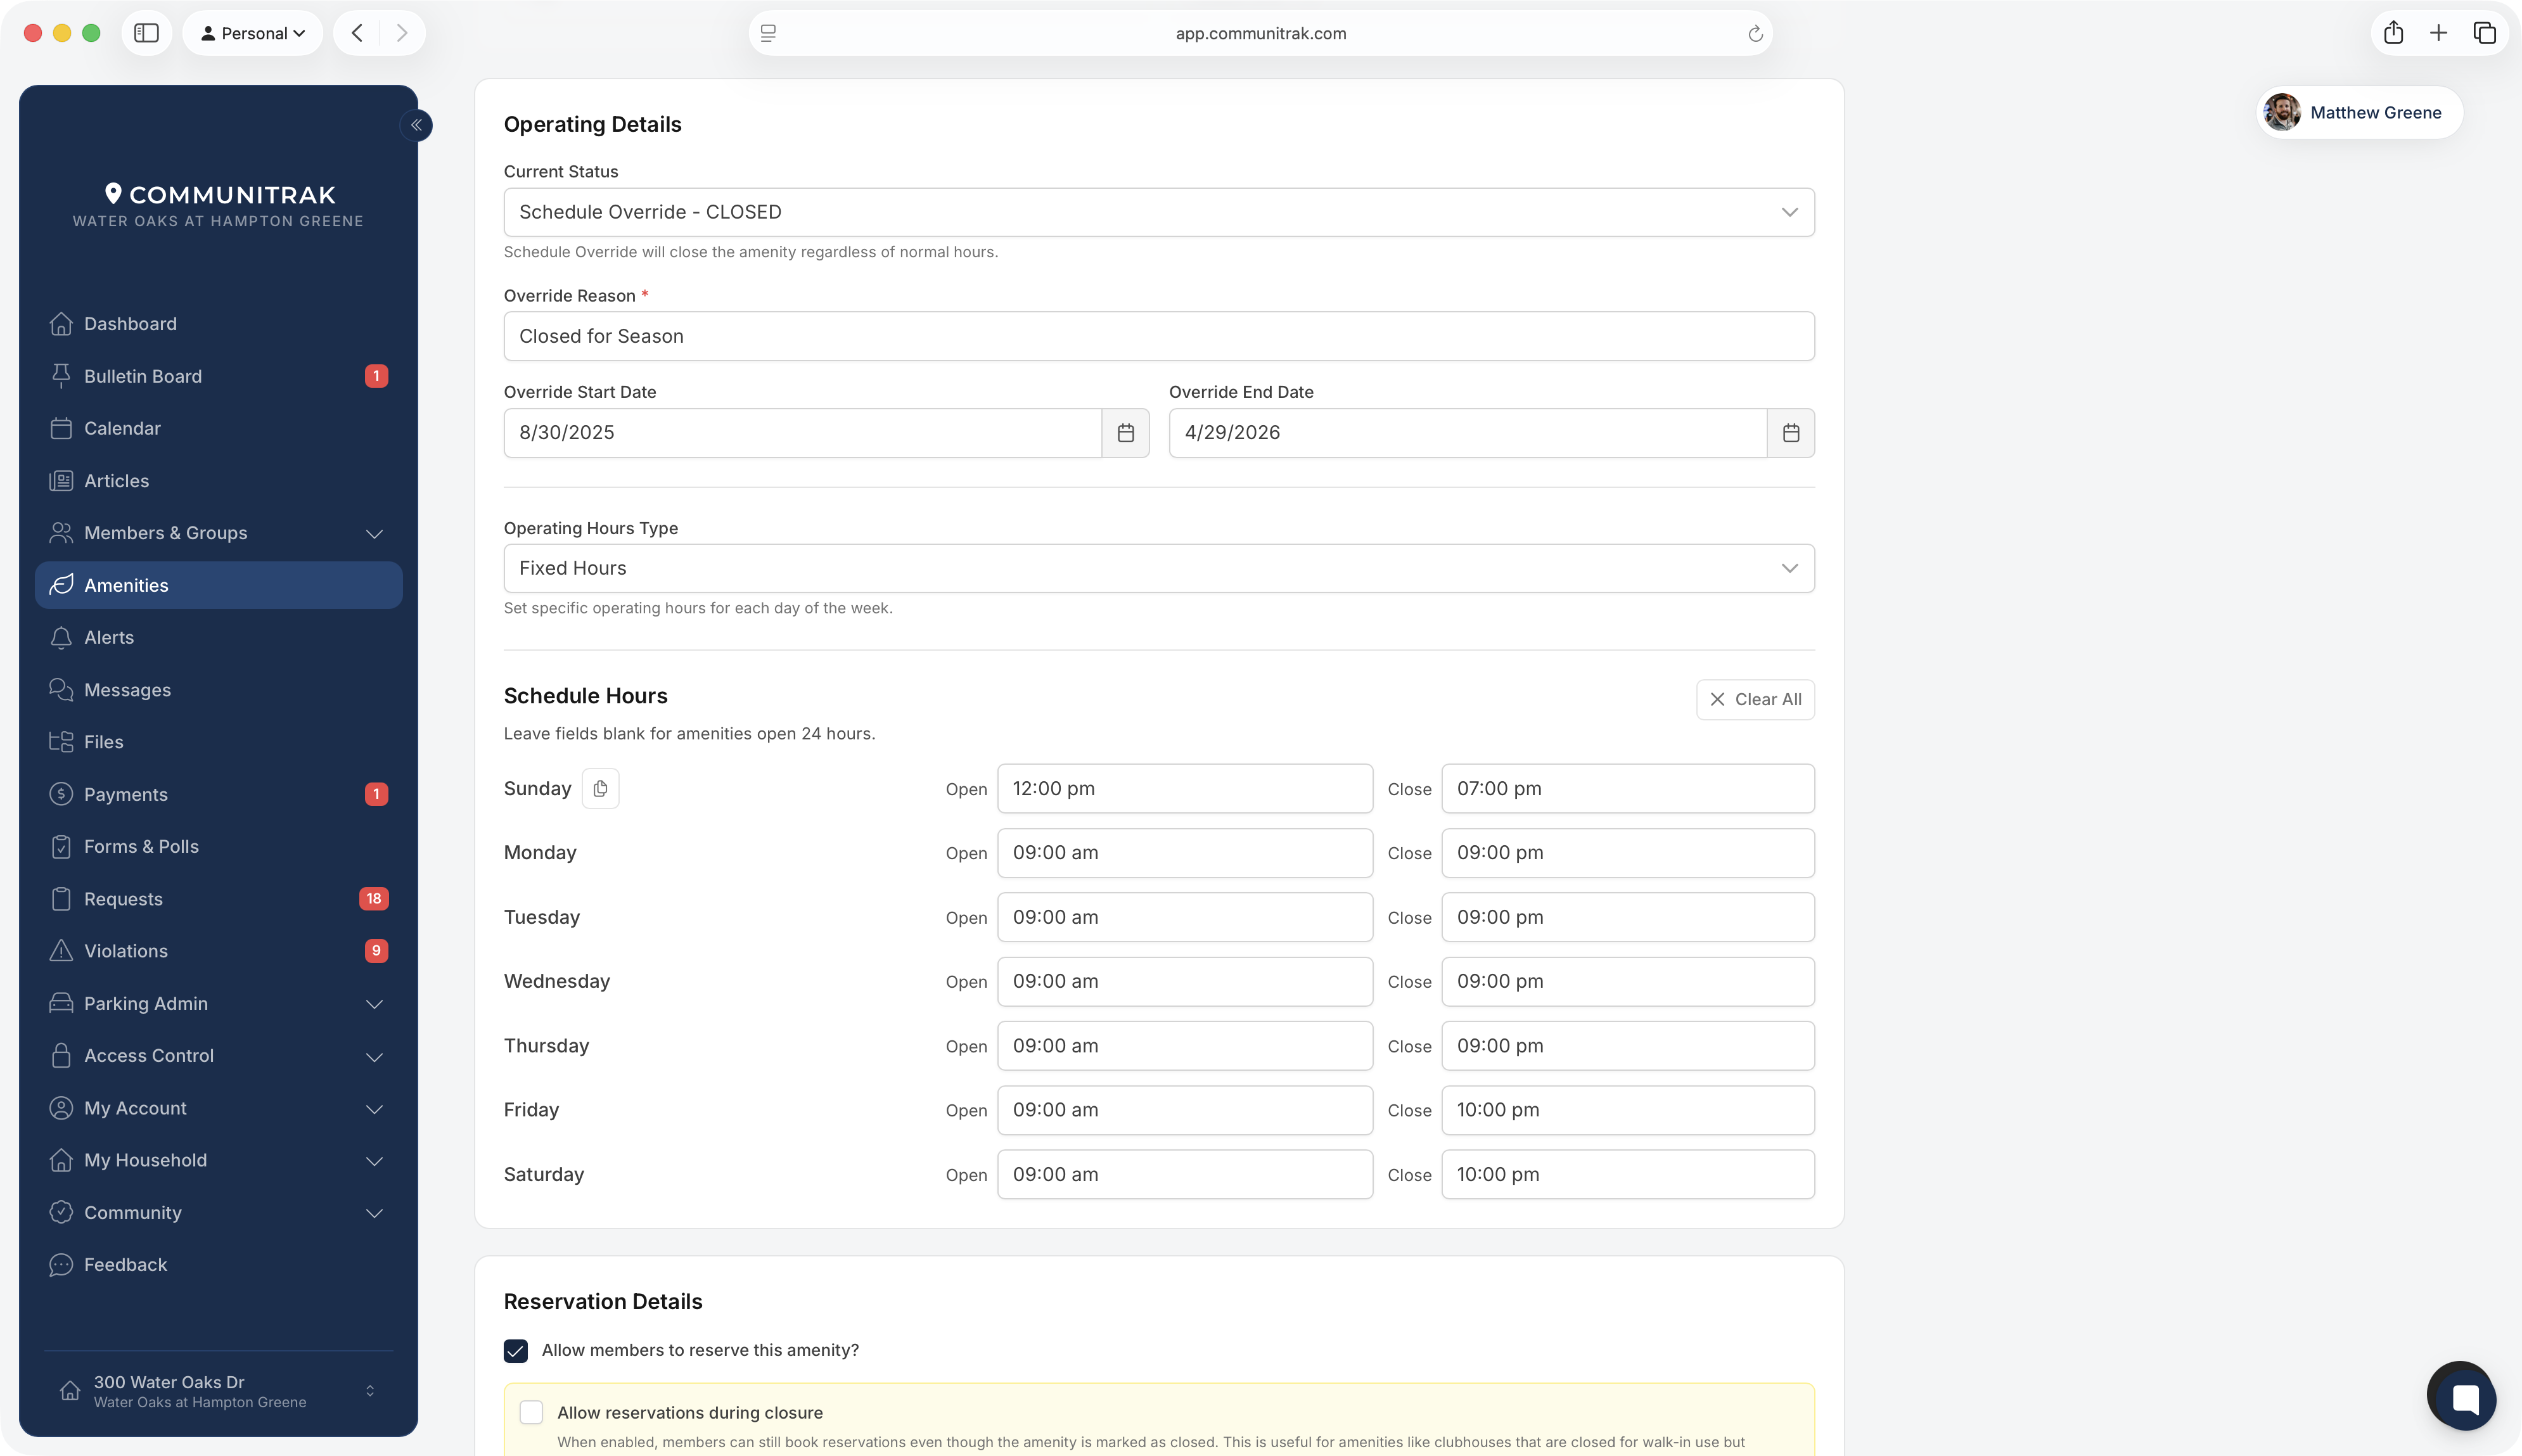
Set Current Status to Schedule Override - CLOSED.
Enter an Override Reason, such as "Maintenance" or "Weather". Residents see it on the card, for example "Closed - Maintenance".
Set an Override Start Date and an Override End Date. Both are required, and the end date can't be before the start date.
Under Reservation Details, decide whether to keep Allow reservations during closure checked (see below).
Click Save Changes.
The closure covers the start and end dates and every day in between. After the end date, the amenity goes back to its normal hours on its own. The next time you open the edit page, Current Status shows Normal Schedule with a note that the last closure ended. Saving clears the old closure.
Check Allow members to reserve this amenity? to turn on reservations. The settings below appear, along with the Reservation Availability Schedule.
This checkbox appears when Current Status is Schedule Override - CLOSED. Check it to let residents keep booking while the amenity is closed for walk-in use, for example a clubhouse that's available for private rentals. Leave it unchecked to stop new bookings during the closure. It starts unchecked on new amenities.
Reservation Format:
One per time window: one booking takes the whole slot, such as a tennis court.
Multiple per time window: several households can book the same slot, such as a pool. Enter a Maximum Occupancy in persons. Each booking uses up as many spots as its party size.
Reservation Length:
Fixed time slots: splits each day into slots. Set the Weekday Reservation Window Length (Monday through Friday) and Weekend Reservation Window Length (Saturday and Sunday) in minutes: at least 15, in steps of 15.
Whole-day rental (entire availability window): one booking takes that day's whole availability window, such as a clubhouse rented for the day.
Slots run back to back from the start of each day's availability window. A slot that wouldn't finish before the window closes isn't offered. For example, a 9:00 AM to 5:00 PM window with 90-minute slots ends with a 3:00 PM slot.
Total Household Reservation Limit: how many upcoming reservations a household can hold for this amenity at once. Choose No Limit or 1 to 15.
Daily Household Reservation Limit: how many reservations a household can hold for this amenity on one day.
Minimum Reservation Advance: how many days ahead residents must book. Enter 0 to allow same-day bookings.
Maximum Reservation Advance: how many days ahead residents can book.
Maximum Number of Persons per Reservation: the largest party for one booking. Enter 0 for no limit. With Multiple per time window, a party is also limited to the spots left in that slot.
Limits count reservations by everyone in the household, not just the person booking.
These fields appear when the Financial module is on.
Fee Amount: charged when a resident books. It's refunded if they cancel before the cancellation deadline.
Deposit Amount: a refundable deposit. When you enter one, a Deposit Collection field appears:
Charge now (refund on return): charged when the resident books. You refund it from the Reservation Manager after the reservation. Your community covers the processing fees on the refund.
Hold on account (charge only if forfeited): nothing is collected up front. If the deposit is forfeited, you charge it to the household's account from the Reservation Manager. This is the default and avoids processing fees.
Offline (paid outside Communitrak): the resident pays the association directly, such as by check. You record it as received, returned, or kept in the Reservation Manager.
Residents pay with a saved card or bank account when they book, and your community covers the processing fee. A resident who books two back-to-back slots at the same amenity on the same day pays one deposit.
Reservation Cancellation Window: how many hours before the start time residents can cancel their own reservation and get their fee and deposit back. After that, only someone with Manage Reservations can cancel it. Enter 0 to let residents cancel any time before the reservation starts.
Allow reservations for members with a past due balance: when unchecked, households with past-due charges can't book this amenity. New amenities start checked.
Require agreement to Reservation Terms: residents must check "I agree to the reservation terms and conditions." before booking. Enter your terms, such as a liability waiver, in Reservation Agreement Text.
This schedule sets the hours residents can book on each day. It works like Schedule Hours, with the same copy icon and Clear All button, and it's what the reservation slots are built from.
Each day needs both times or neither, and at least one day needs times. A day left blank can't be booked at all. This is the opposite of Schedule Hours, where blank means open 24 hours.
Operating hours don't limit reservations. If the pool is open 6:00 AM to 10:00 PM but its availability schedule says 8:00 AM to 8:00 PM, residents can book from 8:00 to 8:00. Keep the two schedules consistent.
A window can run past midnight. Set a Close time earlier than the Open time, such as 6:00 PM to 2:00 AM, and the last slots fall on the next morning.
To close an amenity to bookings for part of a day or a single date, such as a swim meet, add an event to its calendar instead of using a closure:
On the amenity's card, click Calendar.
Click New Event and fill in the event.
Check Block reservations during this event.
Save the event.
Slots that overlap the event are grayed out for residents. An all-day event blocks the whole day. Blocking doesn't cancel reservations that already exist. You can also create amenity events from the main Calendar by choosing the amenity under Calendar.
Everyone whose role has Manage Reservations gets an email, a push notification, and a notification in Communitrak when a resident books or cancels. This applies to every amenity and can't be set per amenity. Each person can turn the email or push notices off under Account > Notifications > Leadership Notifications > New Amenity Reservations.
Residents get a confirmation email when they book and a cancellation email when they cancel.
Open the amenity's edit page.
In the Danger Zone section, click Delete Amenity.
Check all three boxes to confirm: Remove the amenity, Hide its calendar events, and Keep past reservations for records.
Click Delete Amenity.
You can't delete an amenity that still has upcoming reservations. Cancel them in the Reservation Manager first. Once it's deleted, the amenity and its calendar events disappear from Communitrak, and any linked doors are unlinked. Its past reservations stay in the Reservation Manager and in residents' reservation history.
Amenities are listed alphabetically. You can't reorder them, add a photo, or hide one from residents without deleting it.
Sunrise to Sunset needs your community's location on file. If the amenity shows as closed with no sunrise time, contact Communitrak Support to set it.
When someone with Create Amenity Reservation for Others books for a resident, the past-due rule and the reservation terms are skipped, and fees are added to the resident's account instead of charged to a card. See the article on using the Reservation Manager.
Fees you set while the Financial module was on are still charged if it's later turned off. Set the Fee and Deposit to $0 first if you don't want them charged.
While your community's Communitrak subscription is inactive, amenities can't be created, edited, or reserved. The edit page shows a notice and Save Changes is turned off.
If you have questions or need help, chat with Communitrak Support from any page using the messenger icon in the bottom-right corner.
