The Reservation Manager lists every amenity reservation in your community. Use it to look up a booking, cancel one on a resident's behalf, refund or void a fee, and settle deposits after a reservation. This article also covers booking an amenity for a resident. For setting up amenities and their reservation rules, see the article on creating, updating, and managing amenities.
The Reservation Manager requires the Manage Reservations permission. Booking for someone else requires Create Amenity Reservation for Others. Everyone with Manage Reservations also gets notified when residents book or cancel. Some options may be unavailable or appear differently depending on your level of account access.
Log in to Communitrak at https://app.communitrak.com.
Click Amenities in the main navigation menu.
Click Manage Reservations. On a phone, it's the calendar icon at the top of the page.
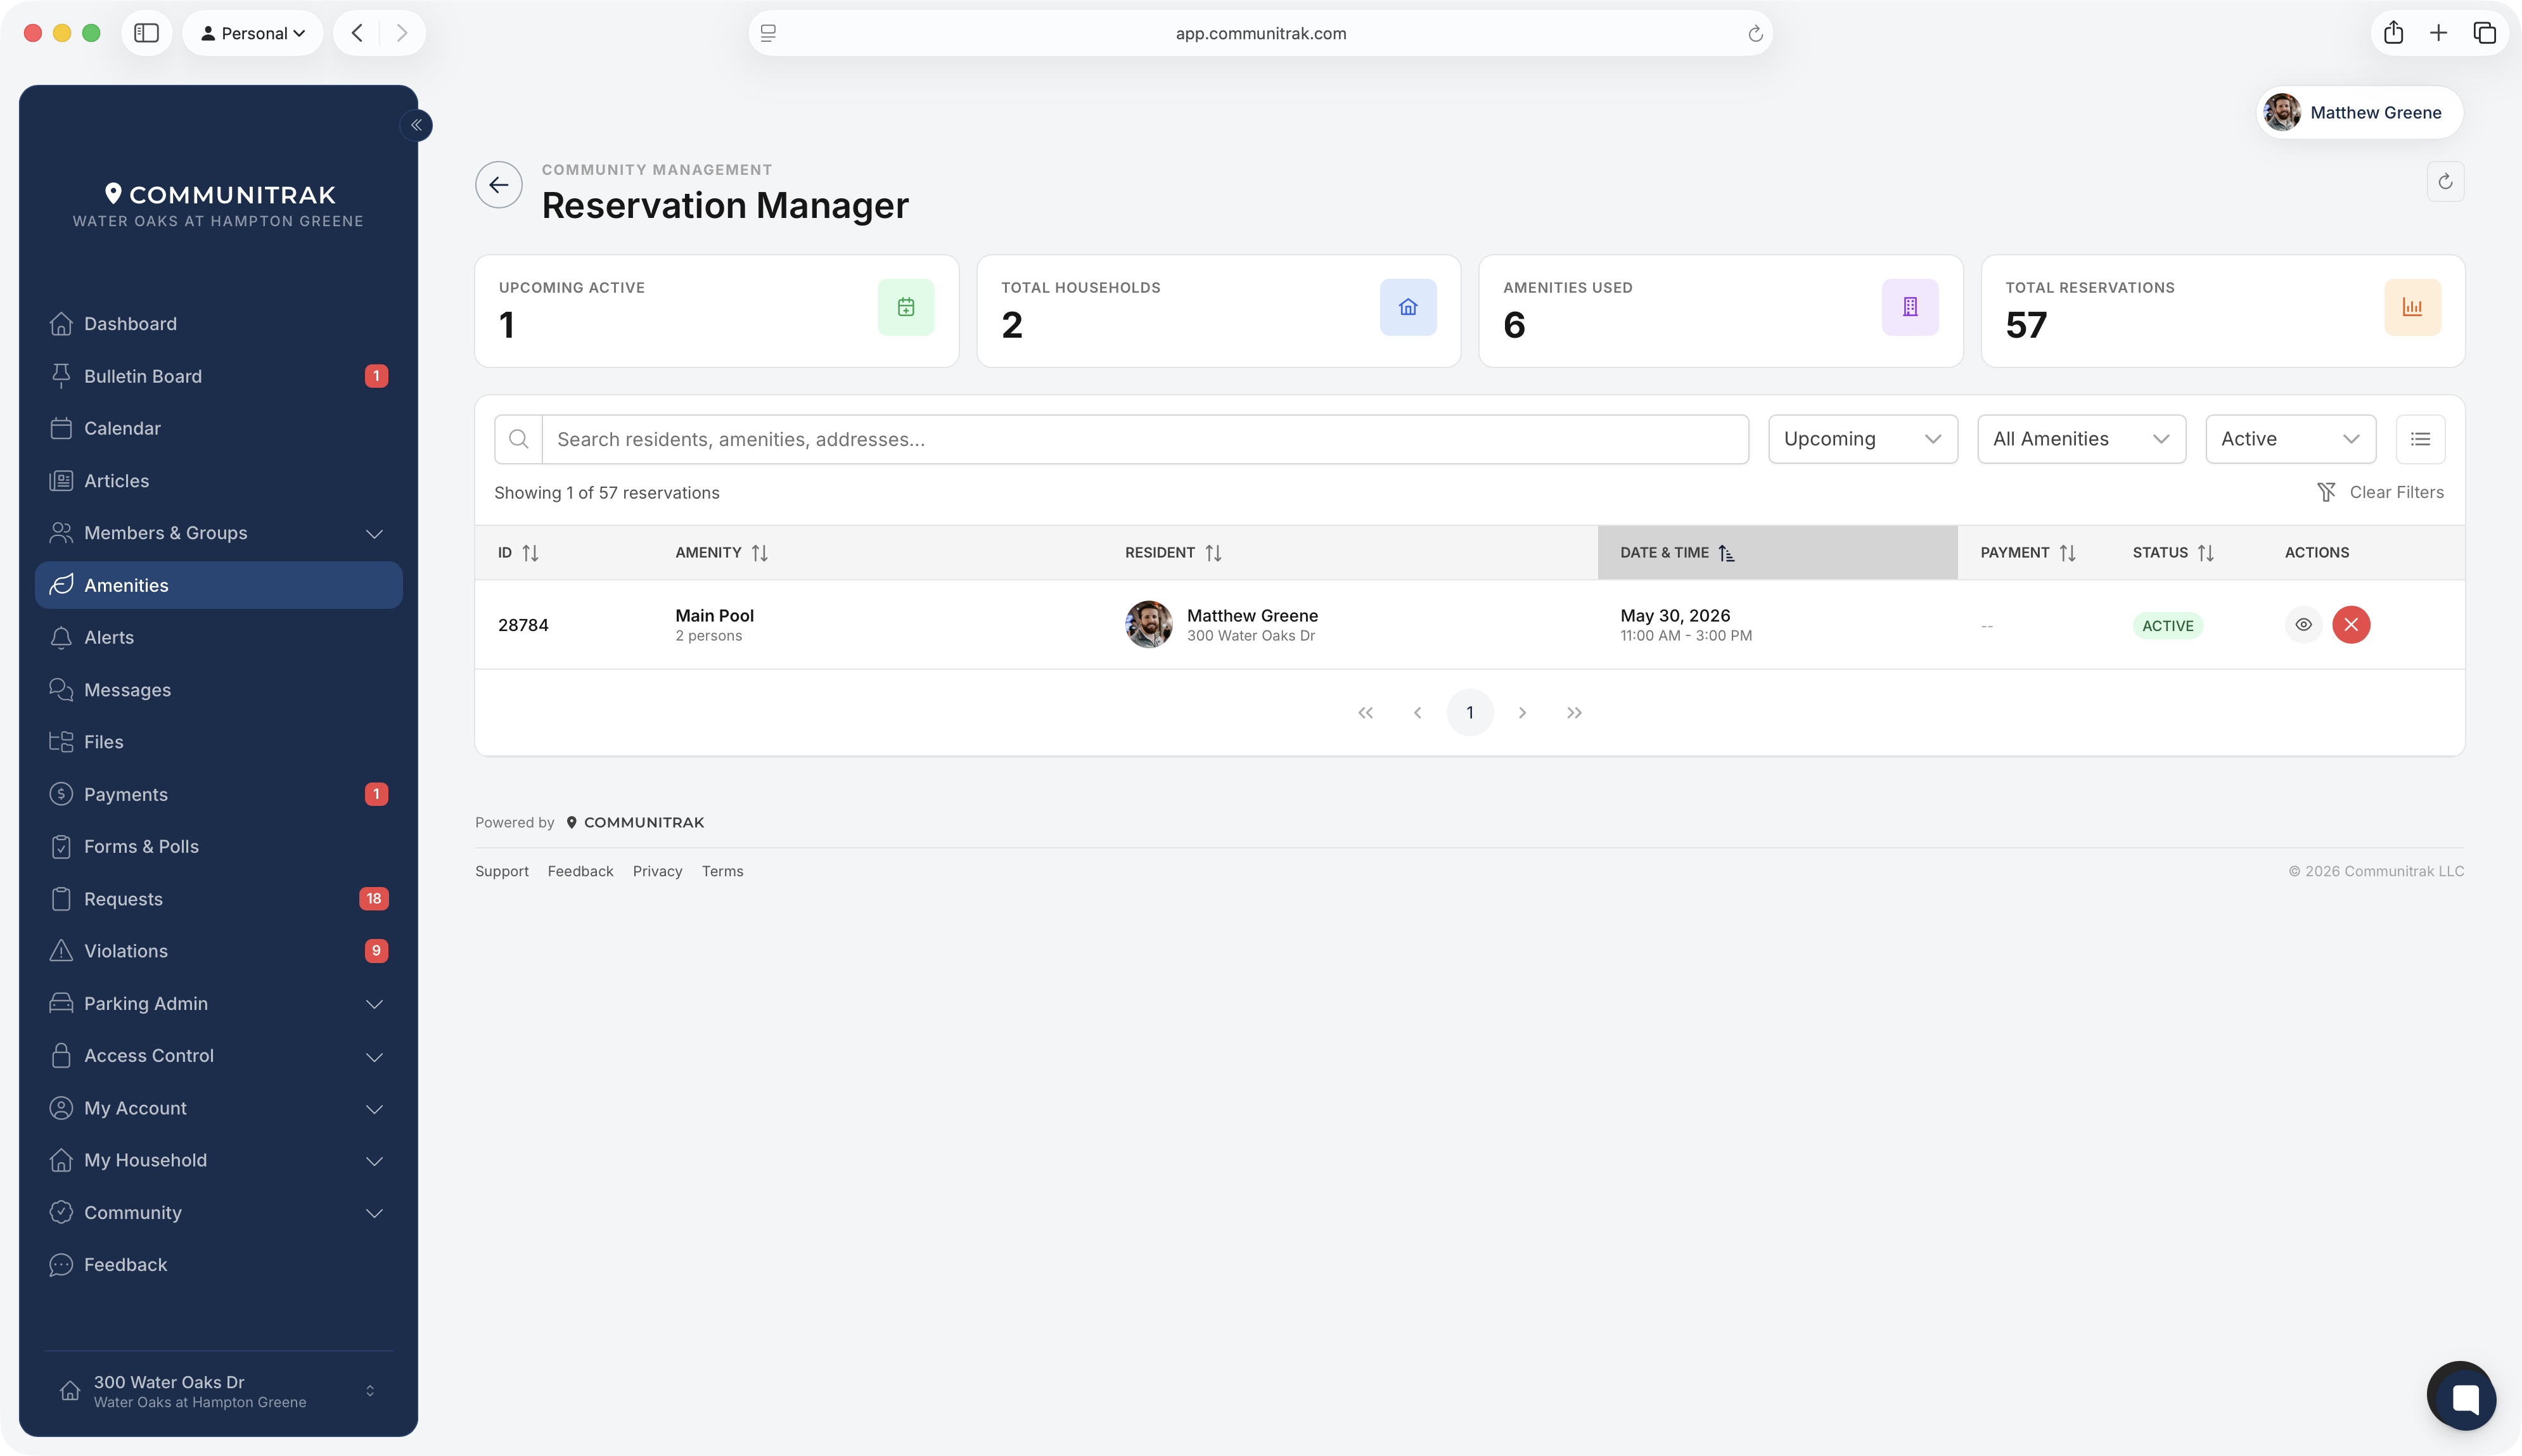
Four cards at the top give community-wide totals, as the caption above them says. They don't change when you search or filter.
Upcoming Active: active reservations that haven't started yet.
Households: households that have ever made a reservation.
Amenities Used: amenities that have ever been booked.
Total Reservations: every reservation ever made, including canceled ones.
The page opens showing upcoming, active reservations for all amenities. To narrow it down:
Search: type a resident's name or email, an amenity, a street address, a reservation ID, or words from the notes.
Time Period: Upcoming, Past, All Time, or Custom Range. Custom Range adds Start Date and End Date fields. A reservation counts as Past once its start time has passed.
Amenity: one amenity, or All Amenities.
Status: All Statuses, Active, or Canceled.
Click Clear Search to remove your search, or Clear Filters to go back to the starting view: Upcoming, All Amenities, and Active.
Upcoming lists the soonest reservations first. Past, All Time, and Custom Range list the most recent first. Use the arrows below the table to page through results, and choose 25, 50, or 100 per page.
Household pages and member profiles have an Amenity Reservations card listing the household's upcoming bookings and how many it's using of each amenity's limit, for example "2 of 3". Click View All on that card to open the Reservation Manager showing only that household. A Household chip above the table shows the address. Click its ×, or Clear Filters, to see everyone again.
ID: click it to open the reservation's details.
Amenity: with the party size if it's more than one.
Resident: who booked it, and their address.
Date & Time
Payment: the fee's and the deposit's status on separate lines, such as "Fee Paid" and "Deposit On hold". A bank payment that's still clearing shows Processing.
Status: Active or Canceled.
Actions: the eye icon (View Details) and, for active reservations, the X (Cancel Reservation).
Click a column header to sort (all but Payment). To hide columns, click the column button next to the filters to open Customize Columns. You can hide Resident, Payment, Status, and Actions, and click Reset to show them all again. Your choice is saved in your browser, so another device starts with every column showing. On a phone, scroll the table sideways.
Click a reservation's ID or the eye icon to open Reservation Details. It shows:
The amenity, status, resident, address, date, time, and party size.
For active reservations, whether it's Within cancellation window, past its deadline (leaders can still cancel), or already started.
Payment: the fee and deposit with their status, plus Total, Total Refunded, and Total Voided where they apply.
Panels for any refunds, voids, or deposit actions that are available (see below).
The reservation number and when it was created.
Notes: the resident's note, followed by a log of what leaders have done, such as cancellations with their reasons, refunds, and deposit changes.
Click Cancel Reservation at the bottom to cancel an active reservation.
Click the X in the Actions column, or Cancel Reservation in the details.
Review the Cancellation Policy panel. It says whether the reservation is still inside its cancellation window.
If the reservation has already started, check Override cancellation policy (Admin privileges). You can't cancel a reservation that has started without it. Past the deadline but not started, no override is needed.
For each fee or deposit listed, check the box to give it back, or uncheck it to keep it. Paid charges are refunded, and unpaid charges are voided.
If the deposit is held on the account, Release held deposit is checked. Leave it checked to release the hold, or uncheck it to keep the deposit held so you can still charge it, for example for a late cancellation.
Enter a Reason for cancellation. It's required, and the resident sees it word for word in their cancellation email.
Click Cancel Reservation, or Keep Reservation to back out.
The deposit box starts checked. The fee box starts checked only if the reservation is still inside its cancellation window, so a late cancellation keeps the fee unless you check it.
What happens next:
Paid charges are refunded to the resident's original card or bank account. Refunds usually show up within 5 to 10 business days.
Unpaid charges on the household's account are voided.
An offline deposit that hasn't been paid yet is closed out. One that's already been paid stays held, so you can Return deposit or Keep deposit from the reservation's details.
A held deposit is released or stays held, depending on your choice.
A bank payment that's still processing is canceled if it hasn't gone through yet, or refunded automatically once it clears. You can't keep it.
The resident gets a cancellation email, and others with Manage Reservations are notified.
Paid charges can be refunded at any time, whether the reservation is active, past, or canceled. This is how you return a deposit that was charged when the resident booked. Unpaid charges can be voided once the reservation is canceled.
Open the reservation's details.
In the panel listing what can be refunded or voided, click Refund Options, Void Options, or Void/Refund Options.
Check the fee, the deposit, or both. Each is refunded or voided in full.
Enter a Reason.
Click Process Refund, Process Void, or Process Void & Refund.
The resident isn't emailed about these. Each action is added to the reservation's notes. If you choose both the fee and the deposit and only one goes through, a Partly Processed message says which.
Deposits are never returned automatically. What you do after a reservation depends on how the amenity collects deposits:
The deposit shows as paid. To return it, use Refund Options as described above. To keep it, do nothing.
Nothing was charged. The details show a Deposit held on account panel.
To return it, do nothing. The resident is never charged.
To keep it, for example because of damage or a late cancellation, click Charge Deposit, enter a Reason, and confirm. The deposit is added to the household's account as a charge due today, which the resident pays from their Payments page. Their card isn't charged automatically, and this can't be undone from the Reservation Manager.
The resident pays the association directly. The details show an Offline deposit panel.
When you receive the payment, click Mark payment received. Choose the Payment method (Cash, Check, Money Order, or Other), optionally add a Reference # such as a check number, and add any notes.
After the reservation, click Return deposit once you've given the money back, or Keep deposit if your community is keeping it. Keeping it records the payment as collected. The resident isn't charged again.
With Create Amenity Reservation for Others, you can book an amenity on someone's behalf, for example when a resident calls the office.
On the Amenities page, click Reserve on the amenity's card.
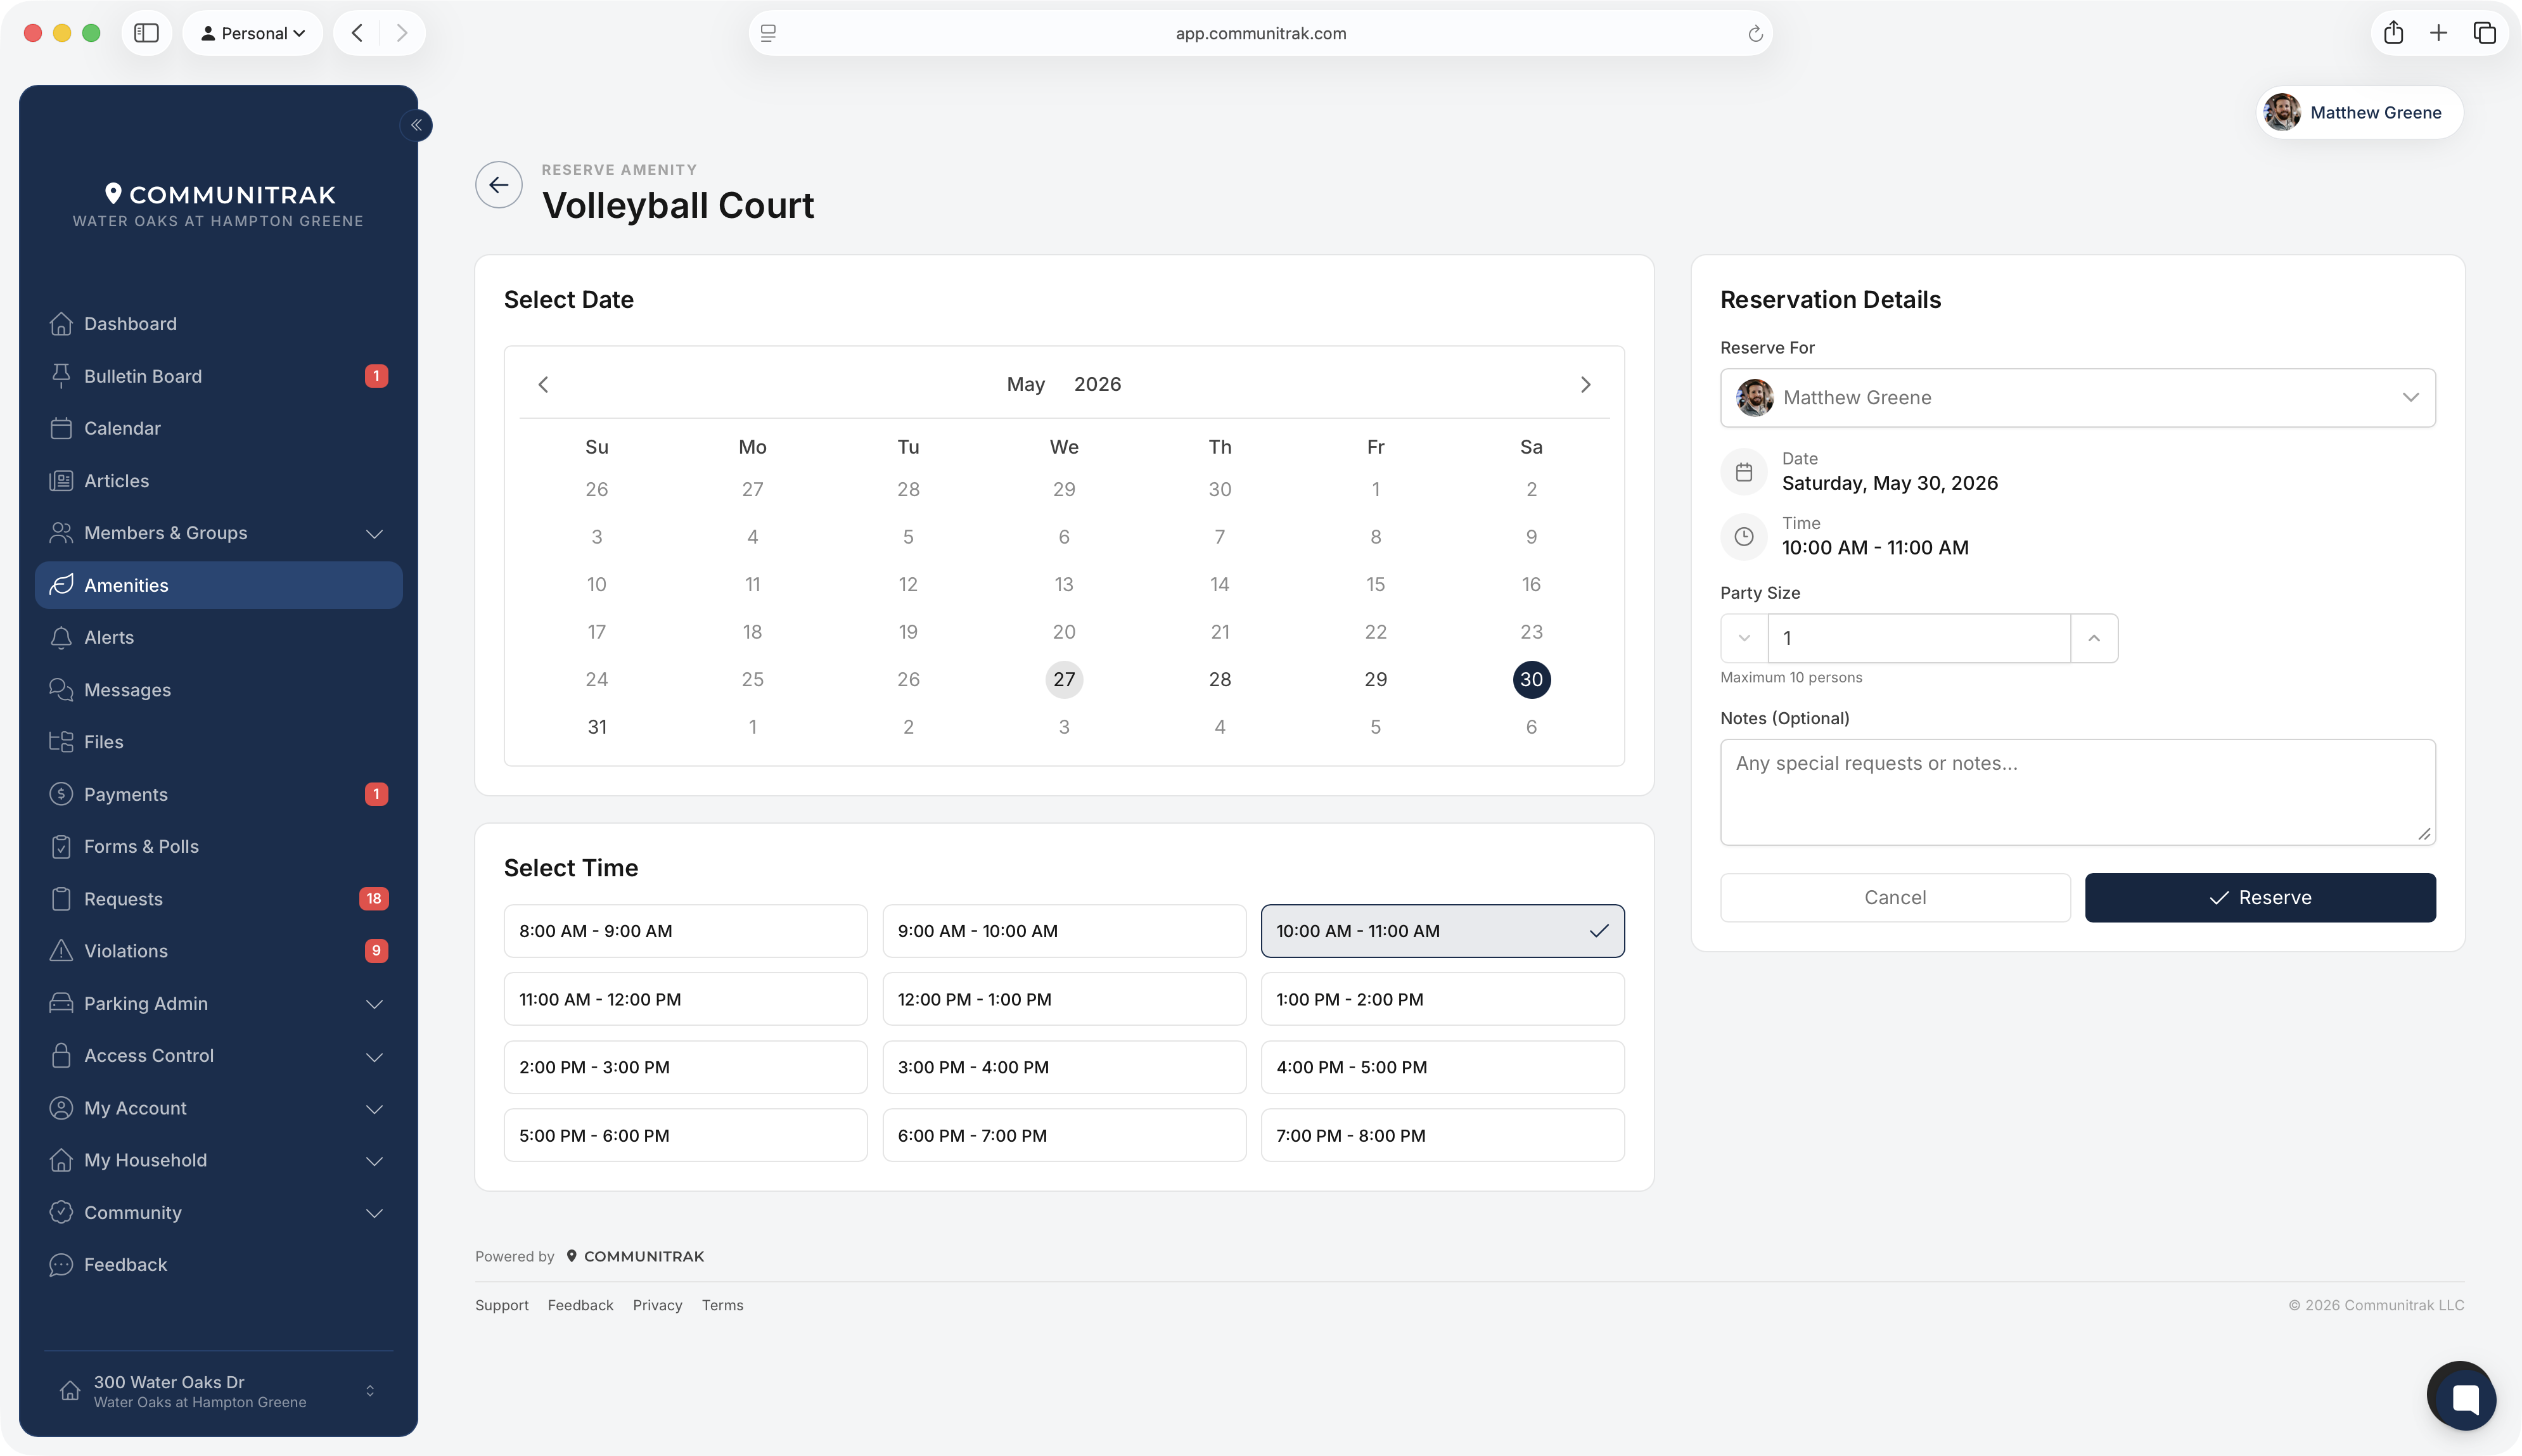
Under Reserve For, choose the resident. The list includes every active member of your community, with their address. Leave it on yourself to book for your own household.
Pick a date, time, and party size, and add any notes.
Click Reserve.
When you book for someone else:
No card is charged. Any fee, and a deposit collected when booking, is added to the resident's household account to pay later. The page shows the Total added to account.
Available times and limits are the resident's household's, not yours.
The resident doesn't agree to the amenity's terms through this booking. A Terms and Conditions Not Agreed notice reminds you.
The past-due rule doesn't apply, to them or to you. The household's reservation limits still do.
The resident gets a confirmation email saying the booking was made for them and the amount added to their account. In the confirmation dialog, click Reservation Manager to come back here.
Everyone with Manage Reservations gets an email, a push notification, and a notification in Communitrak when a resident books or cancels, unless they made the change themselves. Each person can turn off the email or push notices under Account > Notifications > Leadership Notifications > New Amenity Reservations.
Reservations can't be edited. To change a date, time, or party size, cancel the reservation and book a new one.
The Amenity filter lists current amenities only. To find reservations for a deleted amenity, use All Amenities and search for its name.
While your community's Communitrak subscription is inactive, the cancel, refund, and deposit buttons are unavailable.
Click the refresh icon at the top of the page to reload the list. On a phone, pull down to refresh.
If you have questions or need help, chat with Communitrak Support from any page using the messenger icon in the bottom-right corner.
