Communitrak gives Community Leaders two community-wide views on the Financial tab: Charge Management for reviewing and acting on individual charges, and Payments & Refunds for reviewing and exporting payment history. This article covers both.
Both pages require the View Community Financials permission.
The Charge Management link on the Financial tab, and every action on a charge (Mark as Paid, Edit Payment, Void Transaction, and Process Refund), require the Manage Charges permission.
Some options may be unavailable or appear differently depending on your level of account access.
The Financial module must be turned on and payments must be enabled. See Enabling Payments.
Log in to Communitrak at https://app.communitrak.com.
Click Community in the main navigation menu.
Click the Financial tab.
In the Reporting card, click Charge Management.
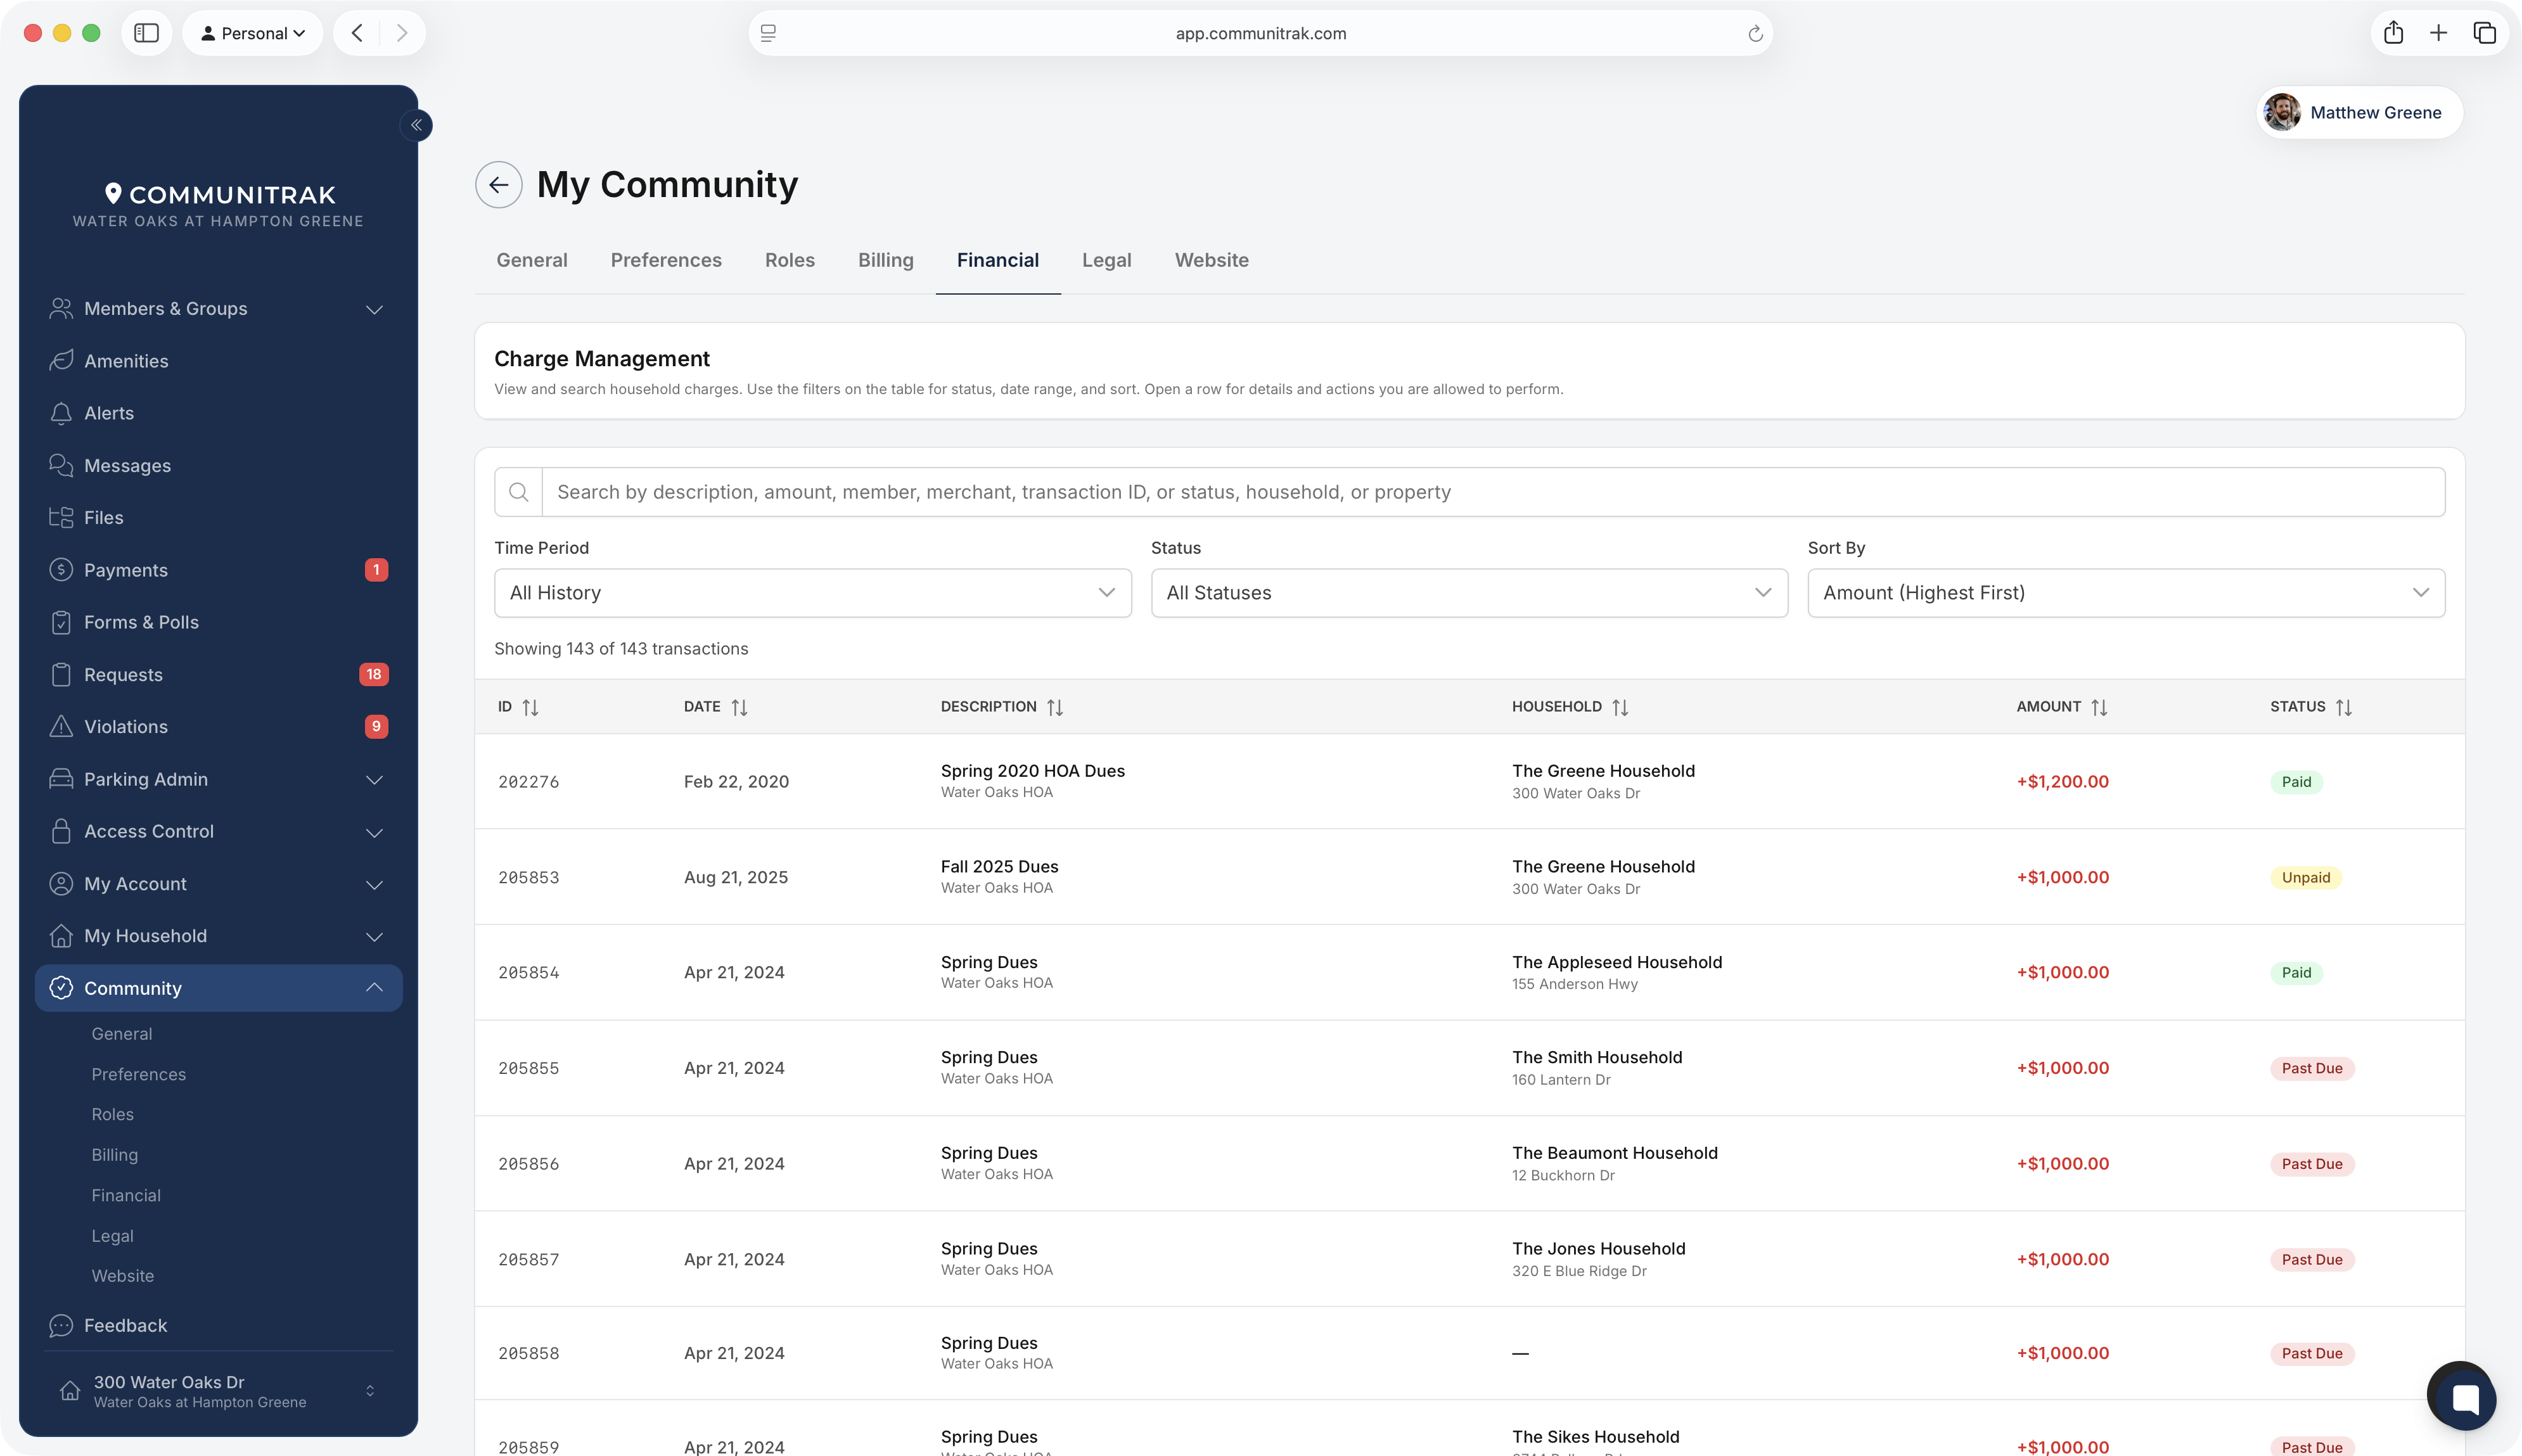
The table lists every charge in your community with these columns: ID, Date (when the charge was created), Description (with the merchant underneath), Household, Amount, and Status. Above the table you can:
Search by description, amount, member, merchant, transaction ID, status, household, or property.
Filter by time period, from All History to Last 6 Months.
Filter by status: Paid, Unpaid, Past Due, Pending, Refunded, or Voided.
Sort by date, amount, status, or description.
The table shows 50 charges per page. A summary above it shows how many charges match your filters.
Click any row to open the Transaction Details dialog. It shows the charge's transaction ID, created date, due date, and member, plus payment details if it's been paid. Below that, Additional Notes shows notes left on the charge, and Payment History shows each action taken on it, who took it, and when.
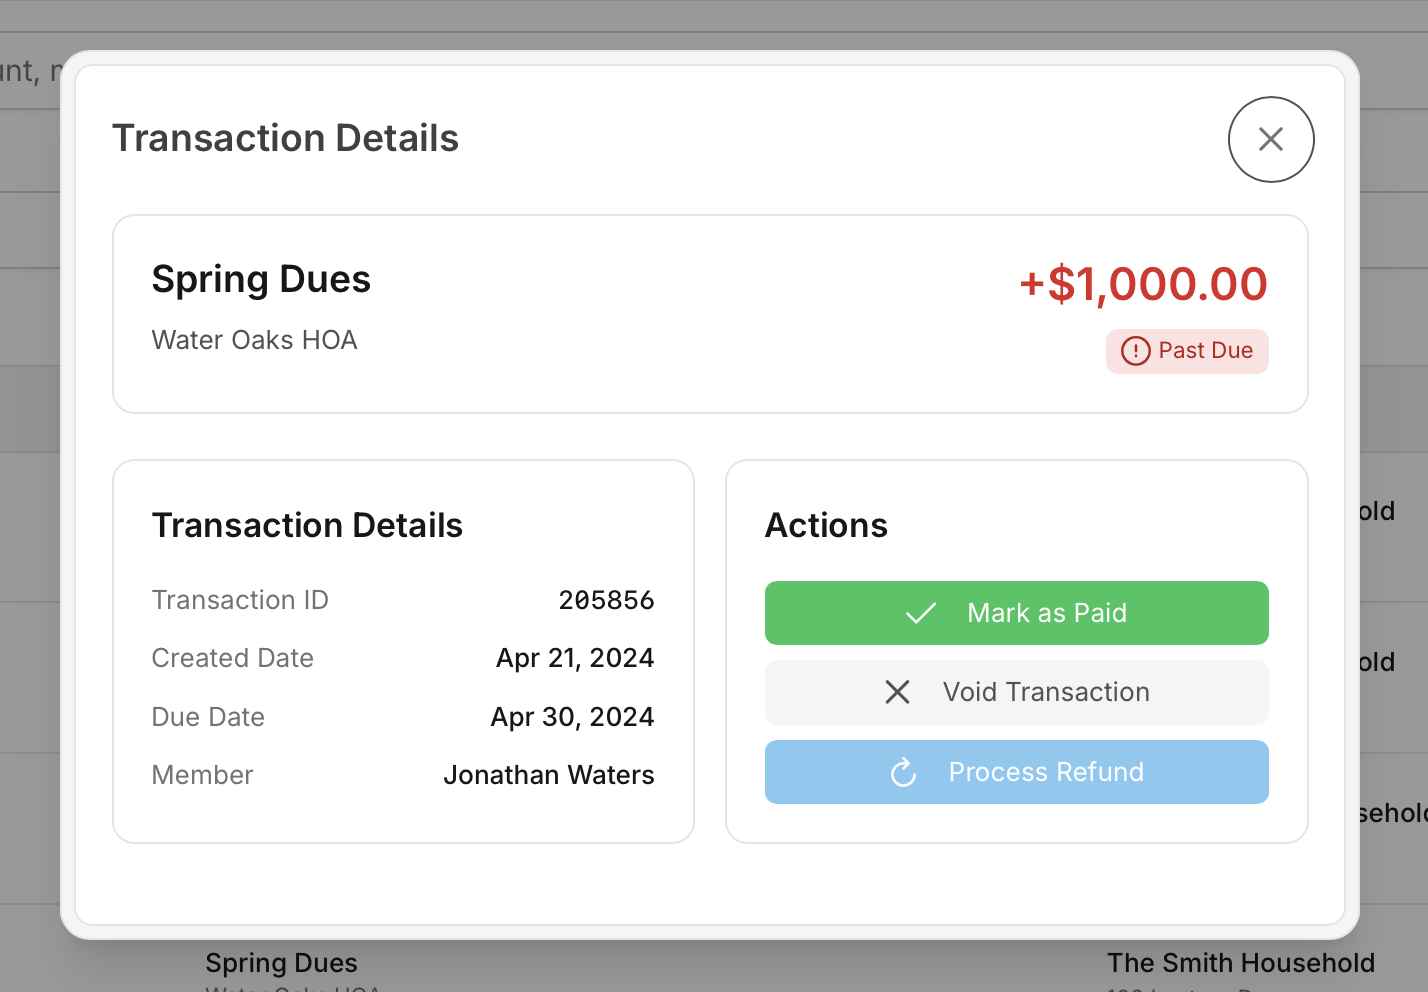
The Actions card in the Transaction Details dialog has up to four buttons. Which ones you can use depends on the charge's status.
Use this to record a payment made outside Communitrak, such as a check or cash. Available on unpaid and past-due charges.
Click Mark as Paid.
In the Mark Charge as Paid dialog, choose the Payment Method: Check, Cash, Manual Card, or Other.
Optionally, enter a Reference # (such as the check number), a Payment Date (leave it blank to use today; it can't be in the future), and Notes.
Click Mark as Paid.
Use this to correct a payment you recorded with Mark as Paid. It appears only on charges paid that way, not on payments made through Communitrak.
Click Edit Payment.
In the Edit Manual Payment dialog, update the payment method, reference number, or payment date, and optionally add a Reason for Edit.
Click Save Changes.
Use this to cancel a charge that shouldn't have been posted. Available on unpaid and past-due charges.
Click Void Transaction.
Enter a Reason for voiding.
Click Void Transaction.
Use this to refund a charge that's been paid.
Click Process Refund.
Enter a Reason for refund.
Click Process Refund.
Refunds are always for the full amount of that one charge. If a resident paid several charges in one payment, refunding one charge refunds only that charge. How the money moves depends on how the charge was paid:
Paid through Communitrak: the refund goes back to the resident's original card or bank account through Stripe.
Recorded with Mark as Paid: the payment is marked as refunded in Communitrak, but no money moves. Return the check or cash to the resident yourself.


Actions are disabled on charges for any household you belong to, and the dialog shows "Actions are disabled for your own household's transactions to prevent conflicts of interest." Another Community Leader needs to act on those charges.
On the Financial tab, click Payments & Refunds in the Reporting card.
The table lists every payment and refund recorded in your community, 20 per page. Each row shows:
ID: the payment record number.
Date: when the payment or refund was recorded.
Type: Payment or Refund.
Property / household: links to the household's profile.
Amount: refunds show as a negative amount.
Method: the card brand and last four digits, the bank name for an ACH payment, Check with its reference number, and so on. Refunds show "Original Tender."
Status: the payment's current status.
Click the arrow at the start of a row to see:
Notes: who recorded each action, when, and any notes they added.
Available on: for payments made through Communitrak, the date the funds are available for payout. It loads from Stripe when you expand the row and doesn't appear for check or cash payments.
Charges settled by this payment or Charges adjusted by this refund: each charge the payment covered, with its amount, description, and merchant. If none are linked, you'll see "No linked charges. This may be due to a duplicate or manual entry."
Click Export CSV at the top right of the page.
Set the Start date and End date. The range starts as the first of this month through today.
Click Export.
The file downloads as community-payments-[communityID]-[startDate]_to_[endDate].csv.
To see one household's charges, open the household's profile and click View Transactions. The same table and Transaction Details dialog appear, limited to that household.
Charges come from several places: bulk charges, single charges posted from a profile, violation fines, amenity reservation fees and deposits, and form submission fees. All of them appear in Charge Management.
The merchant shown under each description is your community's payment account.
Charges can't be edited. To correct an amount or due date on an unpaid charge, void it and post a new one.
If your Communitrak subscription becomes inactive, actions on charges are disabled until it's active again.
If you have questions or need help, chat with Communitrak Support from any page using the messenger icon in the bottom-right corner.
