The Forms & Polls module lets those with access build forms and polls to collect information, votes, signatures, files, and payments from your community. This article covers creating a form, building its questions, choosing who can fill it out, setting up what happens when someone submits, and managing forms from the list.
For filling out a form, see Filling Out Forms and Polls. For reviewing submissions, see Viewing Form Results.
Creating forms, editing questions and settings, pinning, reordering, and managing categories require the Create, Update, & Edit Forms permission.
Publishing, moving to drafts, and closing a form require the Open & Close Form permission. Editing a form that is currently published also requires it, since editing takes the form offline.
Deleting a form requires the Delete Form permission.
Viewing and exporting submissions require View Form Results and Export Form Results.
Some options may be unavailable or appear differently depending on your level of account access.
Log in to Communitrak at https://app.communitrak.com.
Click Forms & Polls in the main navigation menu.
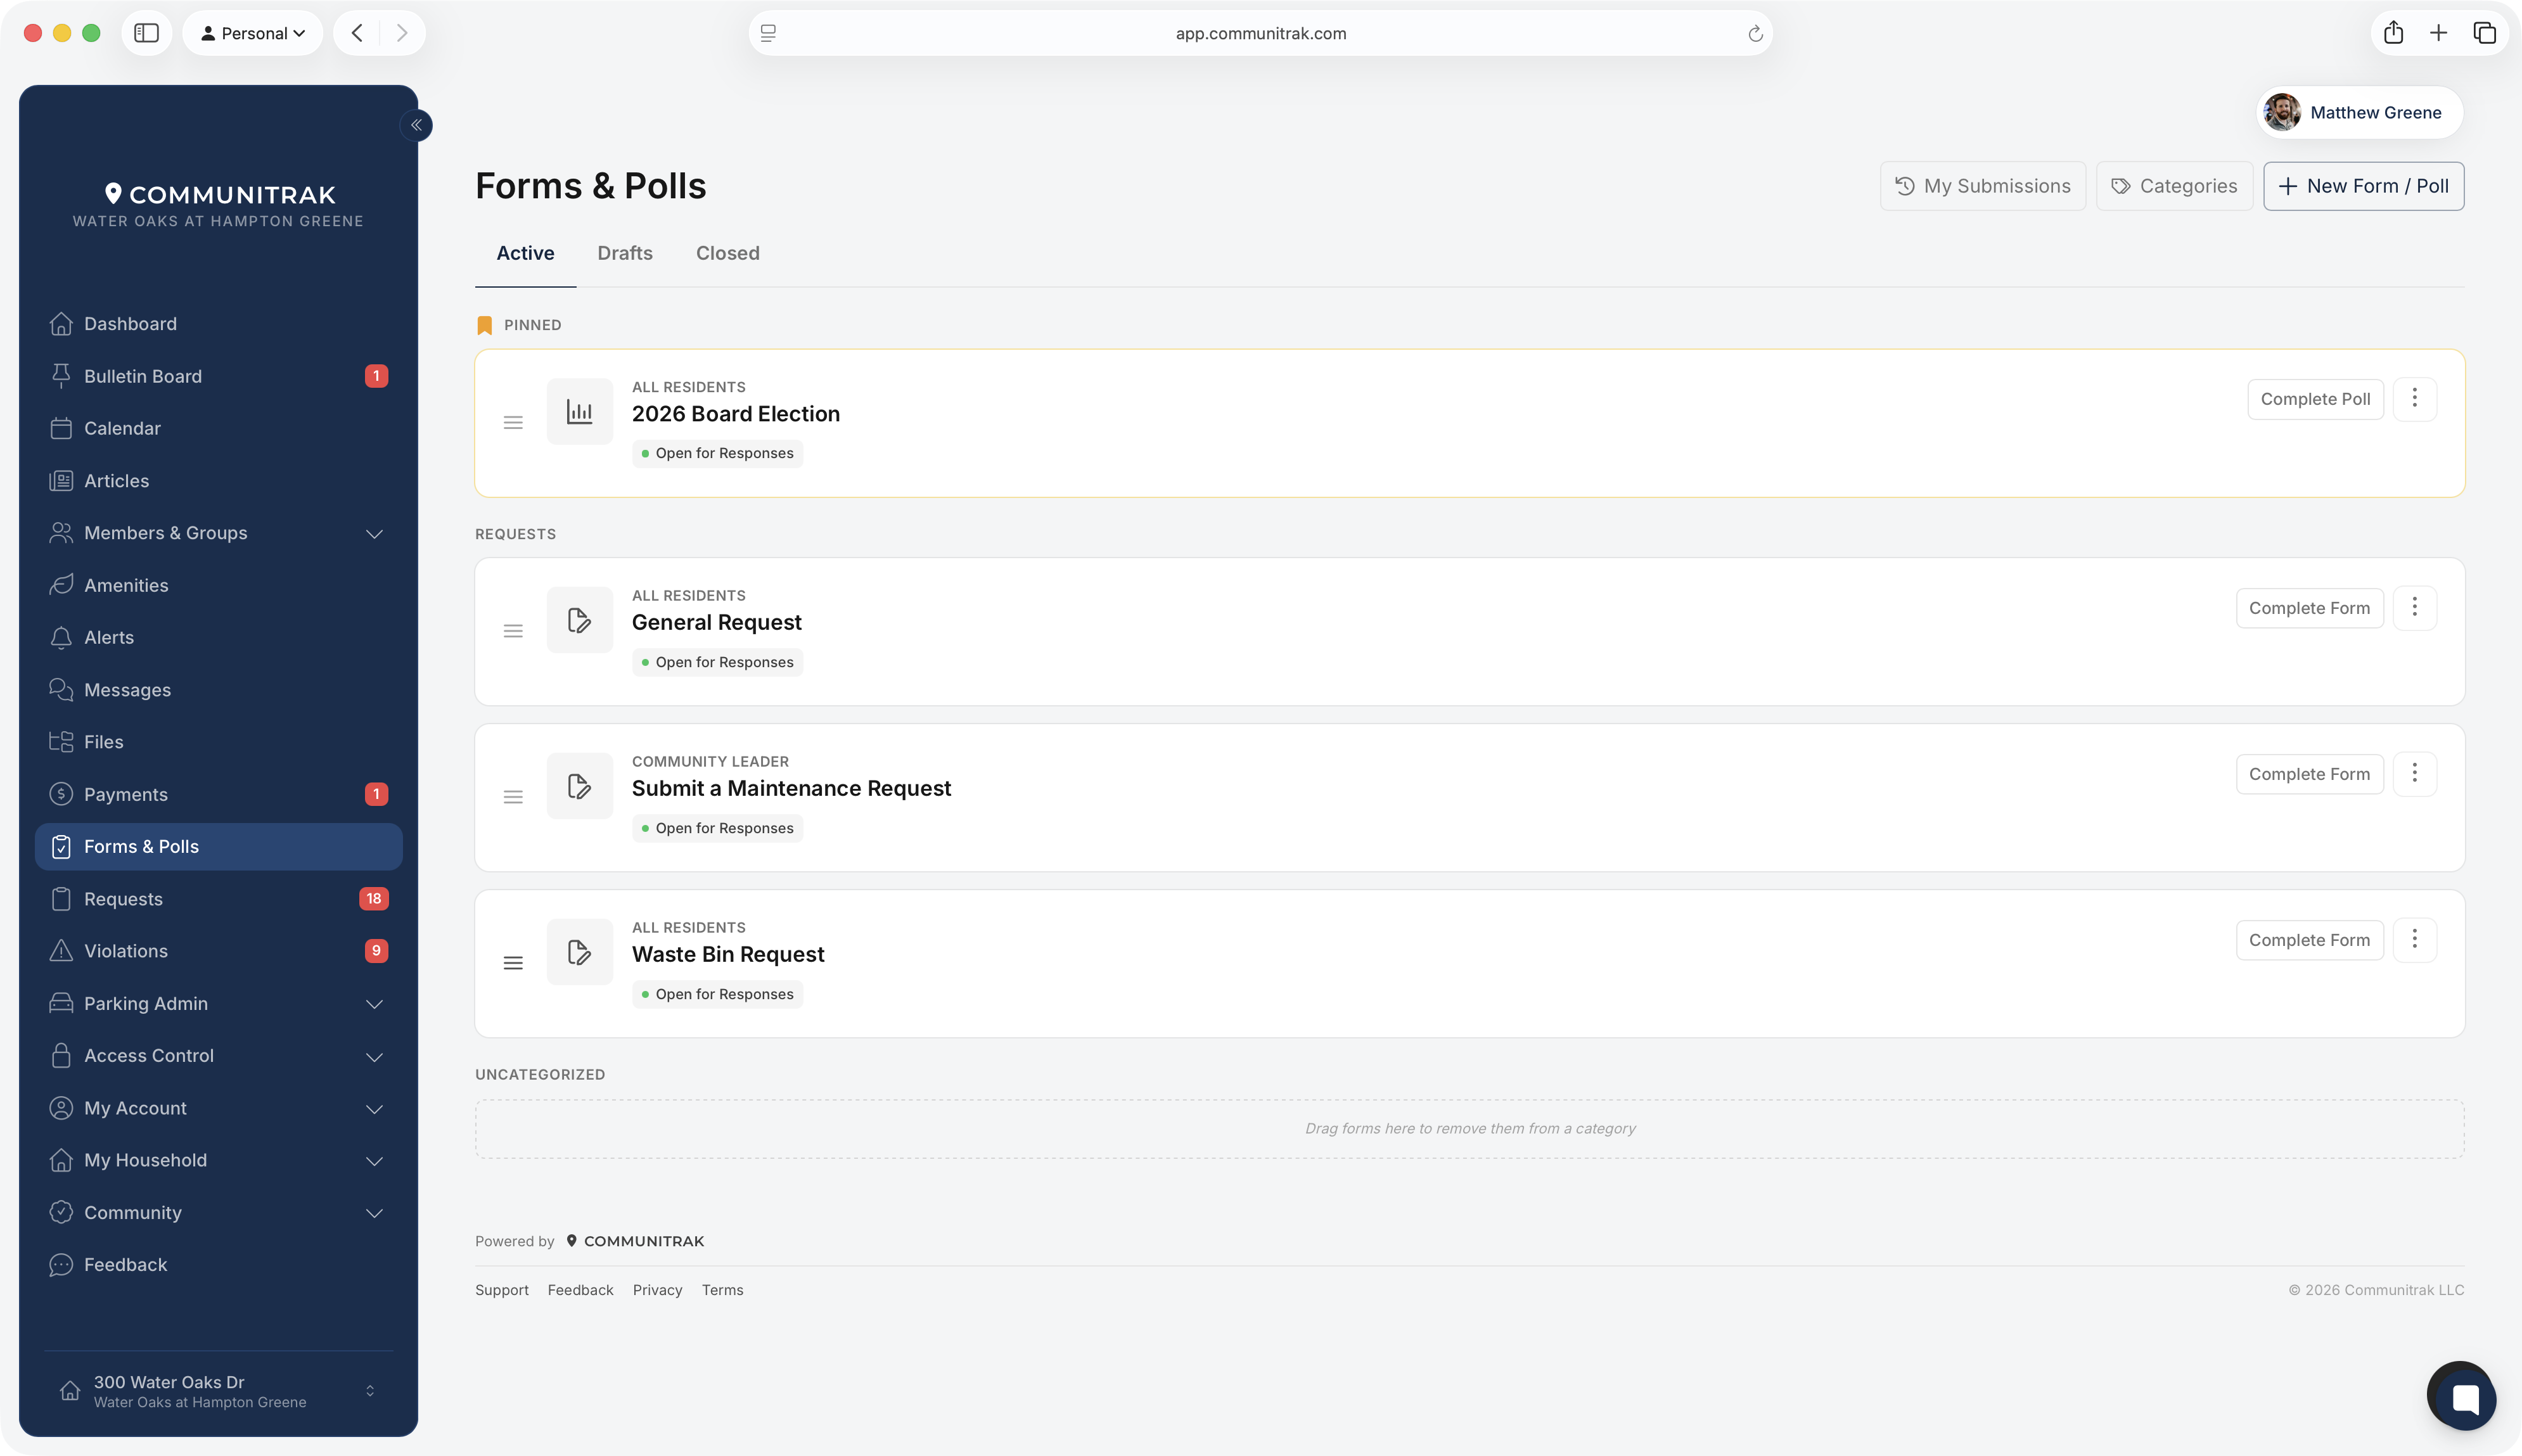
Leaders see three tabs: Active, Drafts, and Closed. Members only ever see active forms meant for them. The buttons in the top-right corner are My Submissions, Categories, and New Form / Poll.
Forms are grouped into sections: Pinned at the top, then one section per category, then Uncategorized, then Public (Website) for forms shared on your public website.
Each card shows the form's title, who it's for (for example "All Residents" or "Pool Committee members"), and its status:
Open for Responses (green): published and accepting submissions.
Not Published (yellow): a draft. Members can't see it.
Closed for Responses (red): no longer accepting submissions.
Click New Form / Poll.
Fill in the dialog:
Type: Form or Poll. Polls get charts on the results page. Otherwise the two work the same way.
Form Name (or Poll Name): required.
Target Audience: required. Choose All Members, or any combination of roles and member groups. Choose Public (Website Visitors) to put the form on your public website instead (see Share a form on your public website below).
Completion Limitations: Unlimited completions, or a set number from 1 to 10. When you set a number, choose whether it counts per member, per household, or per property. For a one-vote-per-home poll, choose 1 per household.
Anonymous Results: Show who submitted each response, or Do not show who submitted each response. Once a form is anonymous, it can't be changed back.
Click Create Form (or Create Poll).
The form is created as a draft and opens in the form editor so you can add questions.
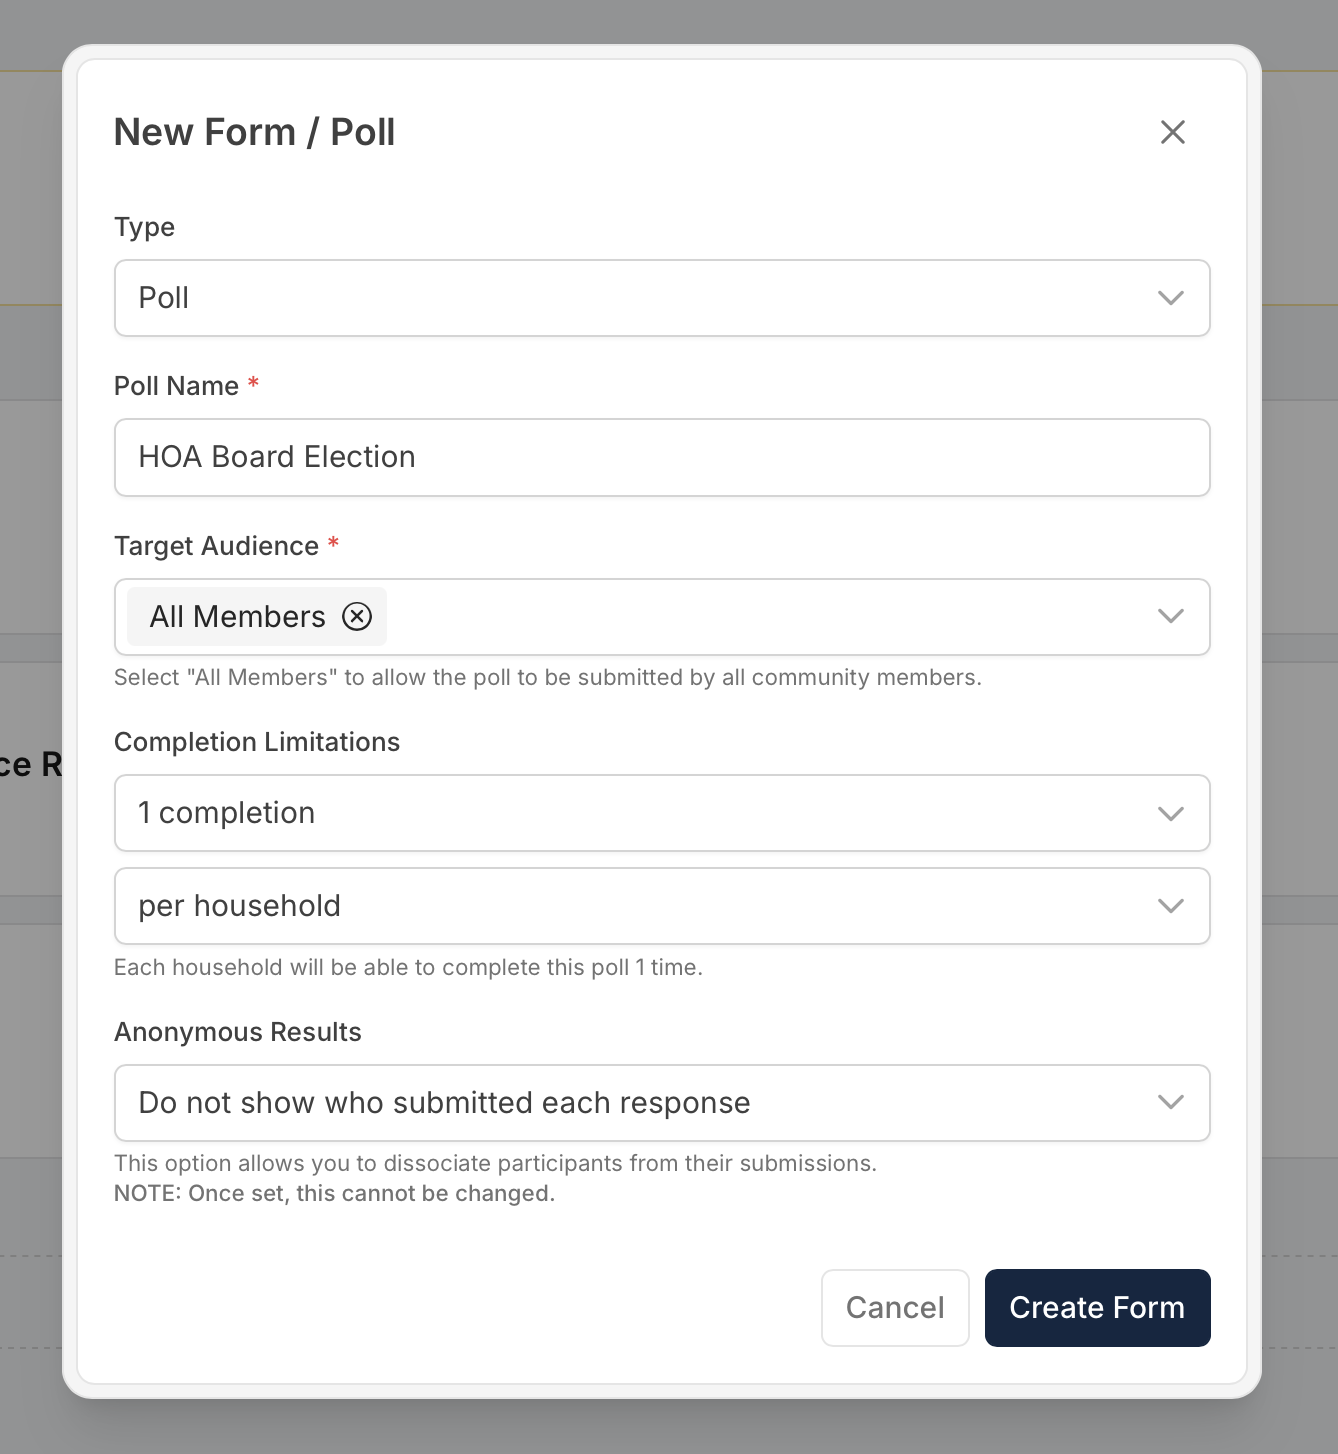
The screenshot above shows an example poll for an HOA board election. Poll is selected so the results are shown as charts. The target audience is All Members, the completion limit allows only one vote per household, and results are anonymous, so voters' names aren't shown with their submissions.
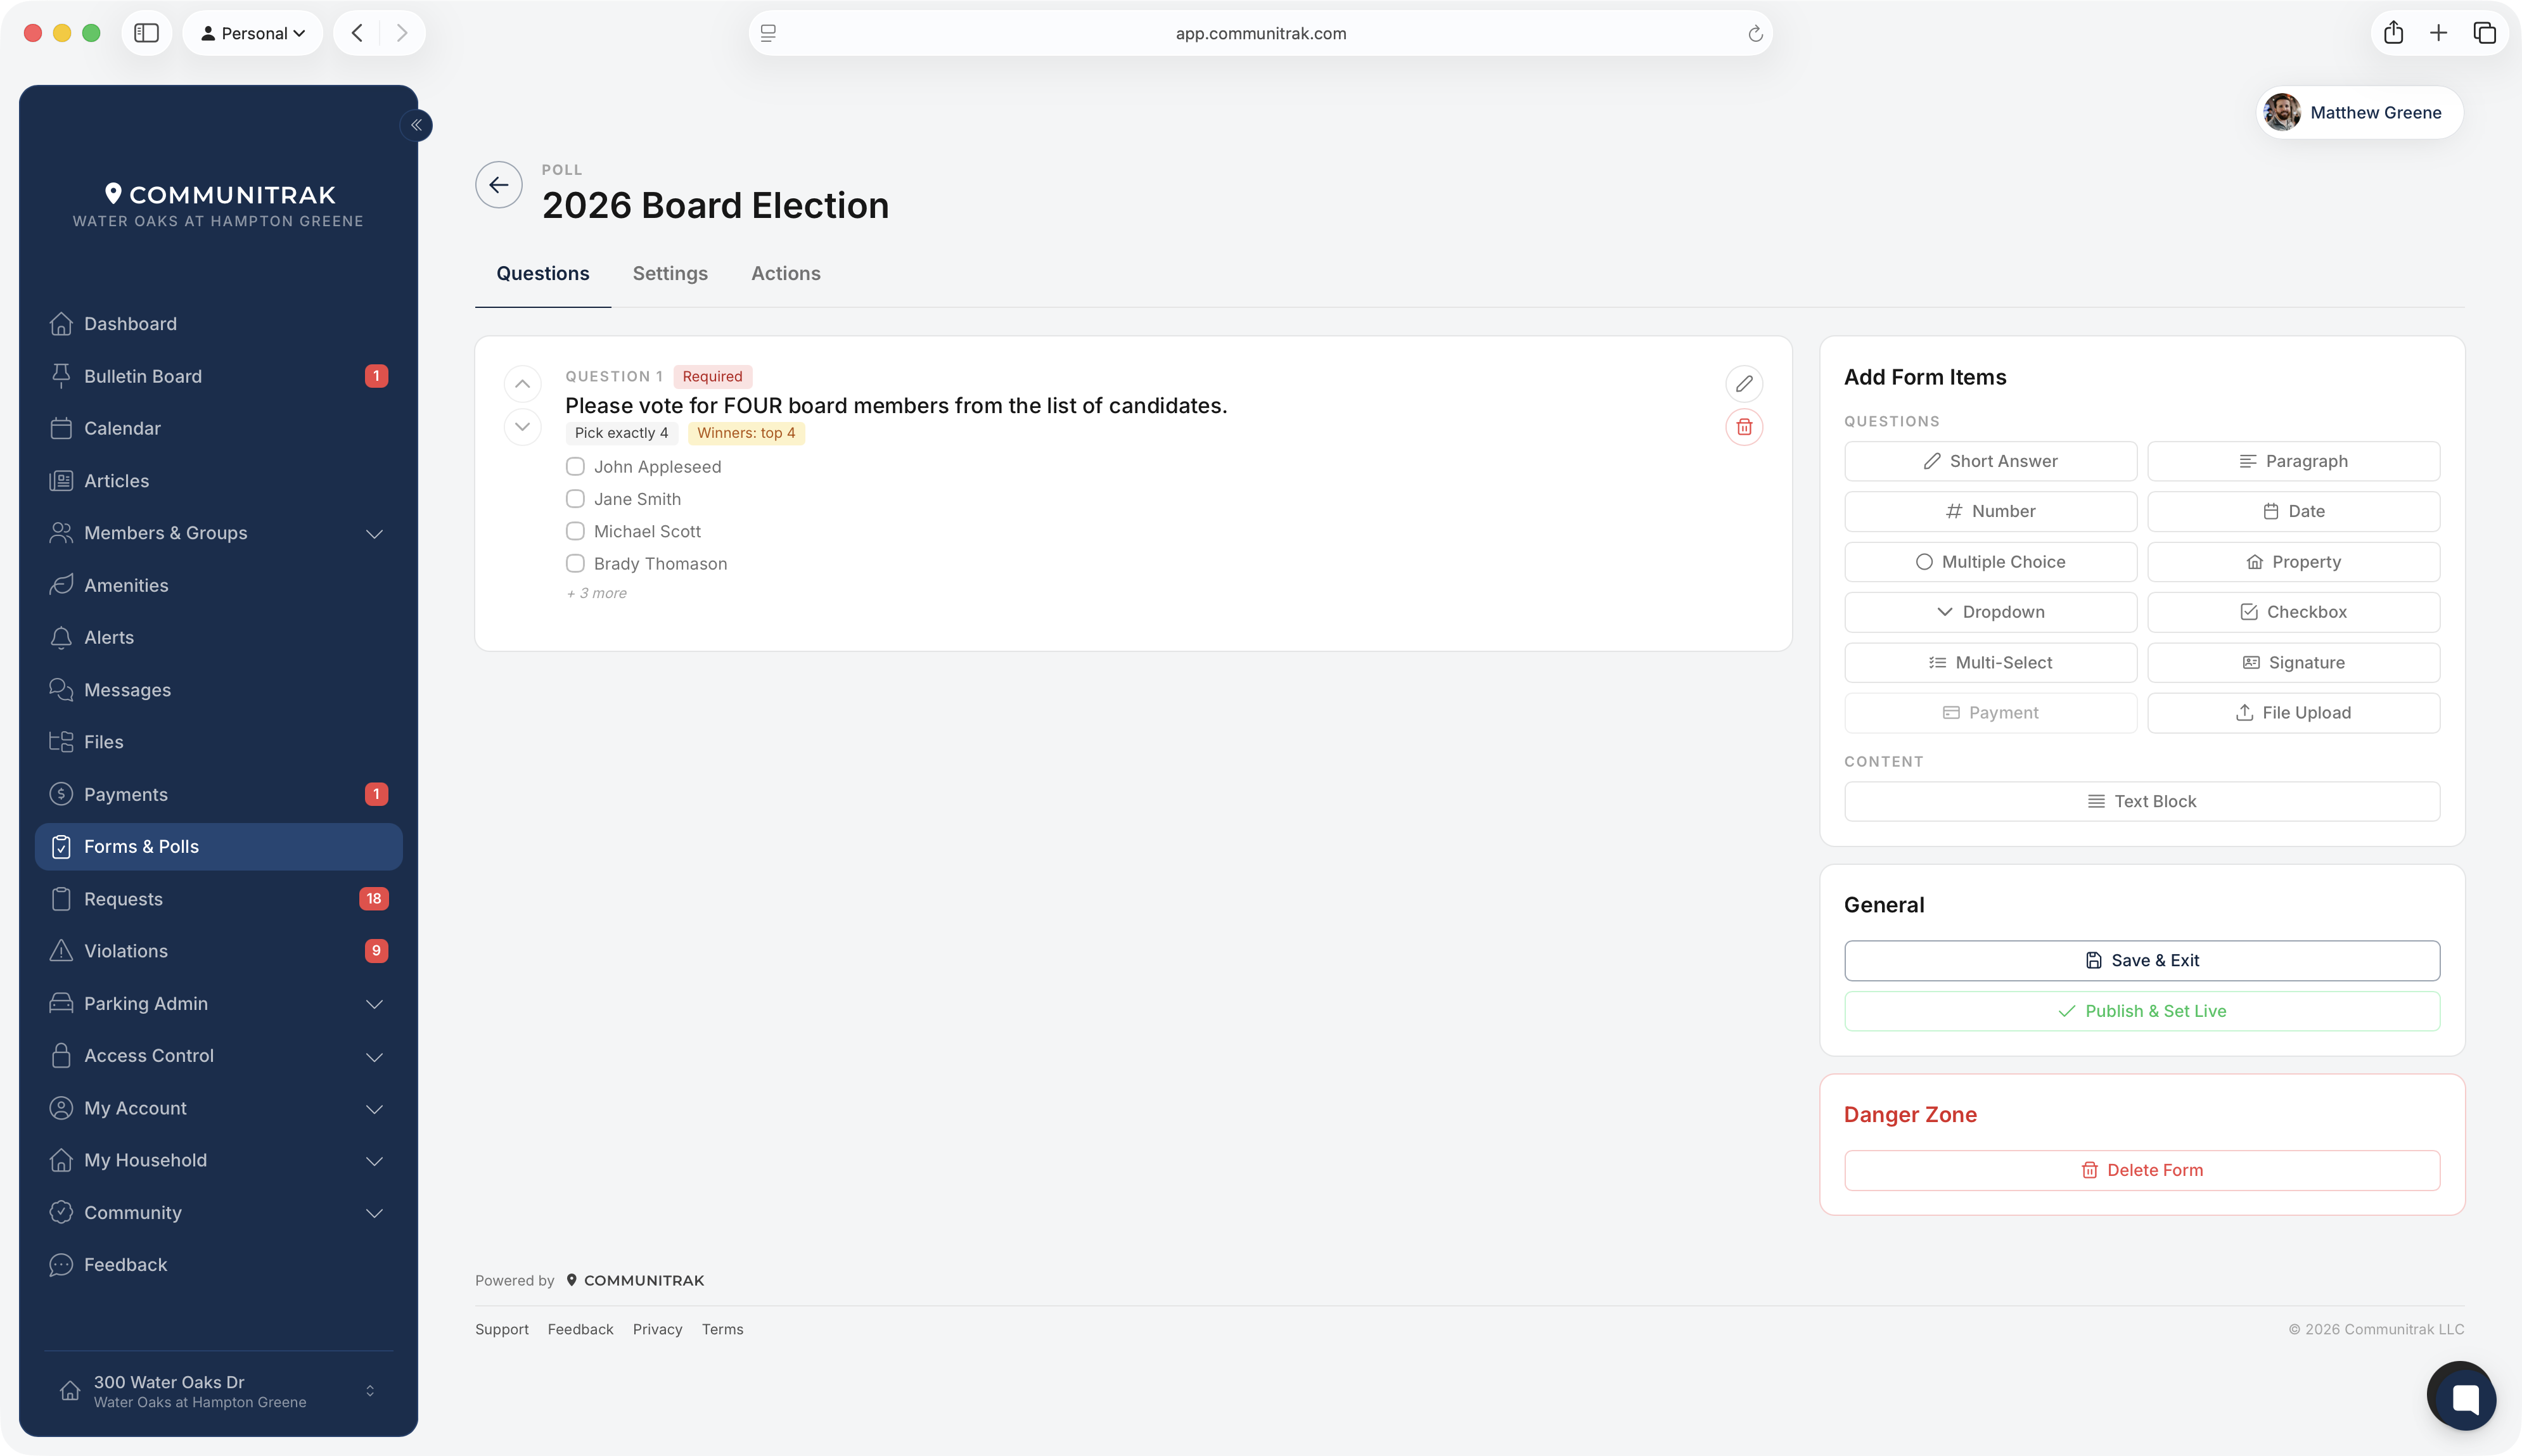
The editor has three tabs: Questions, Settings, and Actions. On the Questions tab, your questions are on the left and the Add Form Items panel is on the right.
Click a question type to add it. A dialog opens where you fill in:
Question Text: the question itself.
Support Text (Optional): extra guidance shown under the question. For a Checkbox question this is the Checkbox Label shown beside the box instead, for example "I agree to the pool rules."
Required Question: whether the question must be answered.
Any options the type needs, then click Save.
Each question is saved as soon as you click Save in its dialog.
Short Answer: a single line of text.
Paragraph: a larger text box.
Number: a number, with an optional Minimum value and Maximum value. Answers outside the range are rejected.
Date: a date picker.
Multiple Choice: pick one from a list of Choices.
Dropdown: pick one from a list of Dropdown Options.
Checkbox: a single box to tick. A required checkbox must be ticked, which makes it a good fit for "I agree" statements.
Multi-Select: pick several from a list of Options / Candidates. You can set a minimum and maximum number of selections, and a Number of winners, which highlights the top choices on the results page. This is how you run an election for several open seats.
Property: a searchable list of every property address in your community. Member names are not shown. Not available on public forms.
Signature: a pad the member signs with a mouse or finger.
File Upload: one file per question, up to 10 MB. PDFs, Office documents, images (JPG, PNG, GIF, BMP), and text files are accepted.
Payment: see Collect a payment below.
Text Block (under Content): formatted instructions or information. Text blocks aren't numbered and don't collect an answer.
To reorder questions, drag the handle on the left of a question card. Use the pencil to edit a question and the trash can to delete it. Deleting a question hides it from future submissions, but answers already submitted are kept.
A Payment question charges the member's saved card or bank account when they submit the form, for example for a pool key, a gate remote, or an application fee. Your community must be set up to accept payments first. See Enabling Payments.
Question Heading: what the member sees above the items.
Selection Mode: Pick any (checkboxes) lets the member choose several items, and Pick one (radio) allows only one.
Items: a label and amount for each item. Click Add Item for more.
Things to know about payment questions:
Payment questions are always required, and a form can have only one.
They can't be added to anonymous forms or public forms, because a charge has to belong to a household.
The payment is posted to the member's household on the Payments page, described by the items they chose. If the form also creates a request, the payment is linked to that request.
If your community passes processing fees on to residents, the member sees the fee and a total that includes it before they authorize the payment, and they're charged exactly that total.
If a card is declined, nothing is submitted and the member is told why so they can try again.
To refund a form payment, find the charge on the household's transactions and use Process Refund. See Managing Charges and Payments. The submission then shows Refunded.
When the questions are ready, click Publish & Set Live in the General card on the right. The form becomes available to its audience right away. A form needs at least one question (not counting text blocks) before it can be published.
Save & Exit saves the Settings tab and returns you to the list without publishing. If the save fails, you stay on the page so nothing is lost. The Danger Zone card holds Delete Form.
Publish & Set Live only appears if you have the Open & Close Form permission, and the Danger Zone only if you have Delete Form.
The Settings tab holds the same choices as the New Form / Poll dialog: Form Title, Type, Target Audience, Completion Limitations, and Anonymous Results. Click Save Settings to apply changes. If you try to leave with unsaved changes, Communitrak asks whether to Stay or Discard & Leave.

A public form can be filled out by anyone visiting your community's public website, with no Communitrak account. It's useful for things like a contact form, a vendor inquiry, or a rental application from someone who isn't a member yet.
On the Settings tab, set Target Audience to Public (Website Visitors).
Click Save Settings. The public link appears with a copy button.
Publish the form.
Public forms appear in the Forms section of your public website automatically, and in their own Public (Website) section of the forms list. They don't appear in the members' forms list. Visitors give their name, email, and phone along with their answers.
Public forms can't contain Payment or Property questions.
Completion limits don't apply to public forms.
Public forms can't be pinned or placed in a category.
Actions run automatically each time the form is submitted. Both are optional.
Emails each submission to the people you choose, such as the board or a committee chair. Click Add Recipients and pick from the Groups, Members, or Custom Email tabs. Each recipient is added right away. Click View Recipients to see or remove them.
The email includes every answer. It also includes the submitter's name and address, unless the form is anonymous. For a public form it includes the visitor's name, email, and phone.
Turns each submission into a request or violation, so the board can track it through the normal request workflow. This is how you collect requests that need more detail than the standard New Request form asks for, like an architectural application with dimensions, materials, and drawings. Click Configure to choose the request type, title, impact area, and more.
The full setup is covered in Collecting Requests Through a Form.
Click the three-dot menu on a form card for these options:
Edit: opens the form editor.
Copy Link to Form: copies a direct link you can paste into an email, a bulletin board post, or a message. Members still need to log in. For public forms this reads Copy Public Link.
View Results: opens the results page.
Pin to Top / Unpin.
Change Status: move the form to whichever of Active, Draft, or Closed it isn't in now.
Delete.
Set to Active: publishes a draft or reopens a closed form.
Set to Draft: takes the form offline. Members can no longer see it.
Set to Closed: stops new submissions. The form disappears from members' lists, and its results stay available to you.
There is no scheduled open or close date. Open and close forms yourself when the time comes.
Editing an active or closed form moves it back to draft, so members can't fill it out while you work. Communitrak asks you to confirm first. When you're done, publish it again.
While someone has a form open in the editor, its card on the Drafts tab shows "Being edited by" and their name. It's a heads-up, not a lock, so check with them before making changes at the same time. The note clears when they leave the editor, or after two hours.
Existing submissions are kept. If you delete a question, its earlier answers remain visible on the results page, marked Deleted.
Pin the forms members need most so they stay at the top.
Drag form cards to reorder them. Drag a card into a category section to put it in that category, into Pinned to pin it, or into Uncategorized to remove its category. Dragging is the only way to set a form's category.
Click Categories.
Type a name under New category name and click Add.
Use the pencil to rename a category, the trash can to delete it, and drag to reorder. Deleting a category leaves its forms uncategorized.
Click Done.
Click Delete from the three-dot menu and confirm. The form and its results are removed from Communitrak and can't be restored. If you might want the results later, close the form instead, or export the results first.
The Forms & Polls module only appears in the main navigation menu if it is enabled for your community.
New forms start as drafts and aren't visible to members until published.
Anonymous can't be turned off once it's on, and anonymous forms can't take payments or create requests. A form that already has a payment question or a request action can't be made anonymous. Decide before you build.
Anonymous hides who submitted from results, exports, and notification emails. Completion limits still apply, so a "one vote per household" poll stays one vote per household.
Members can't edit or withdraw a submission once it's sent, and submissions can't be deleted. If someone needs to change an answer, have them submit again (if the limit allows) and note which one counts.
There is no way to duplicate a form. To reuse one, build a new form with the same questions.
If your community's Communitrak subscription is in read-only mode, forms can be viewed but not created, edited, or submitted.
If you have questions or need help, chat with Communitrak Support from any page using the messenger icon in the bottom-right corner.
